By: Team W11-B3 Since: Sep 2017 Licence: MIT
1. Introduction
K.N.S. AddressBook is a free Java desktop application available on mainstream operating systems. It is designed for freelancers who are bound to their desks, making many calls to clients with the office’s telephone, simultaneously using their computer to find their clients' contact number.
Most of the interactions in K.N.S. AddressBook are done through an in-built Command Line Interface (CLI), which allows you do add, edit and remove contacts quickly with only the use of a keyboard.
This user guide will help you get started on using K.N.S. AddressBook, and show you how you can make use of it.
2. Table of Contents
- 1. Introduction
- 2. Table of Contents
- 3. Key Features
- 4. Getting Started
- 5. Available Commands
- 5.1. Viewing Help:
help - 5.2. Adding a person:
addora - 5.3. Listing all persons:
listorl - 5.4. Editing a person:
editore - 5.5. Adding a Tag:
addtagorat - 5.6. Deleting a Tag:
deletetagordt - 5.7. Locating persons:
findorf - 5.8. Deleting a person:
deleteord - 5.9. Selecting a Person:
selectors - 5.10. Sorting your contact list:
sort - 5.11. Changing Themes:
theme - 5.12. Listing entered commands:
historyorh - 5.13. Undoing previous command:
undooru - 5.14. Redoing the previously undone command:
redoorr - 5.15. Saving/Backing up your data:
exportorex - 5.16. Importing data:
importori - 5.17. Clearing all entries:
clearorc - 5.18. Exiting the program:
exit - 5.19. Set favourite contacts
In development for v2.0 - 5.20. Contacting a person
In development for v2.0
- 5.1. Viewing Help:
- 6. Command Cheat sheet
- 7. F.A.Q.
- 8. Glossary
3. Key Features
K.N.S. AddressBook has many useful features for you to use. Listed below are some key features found in K.N.S. AddressBook that can help you out.
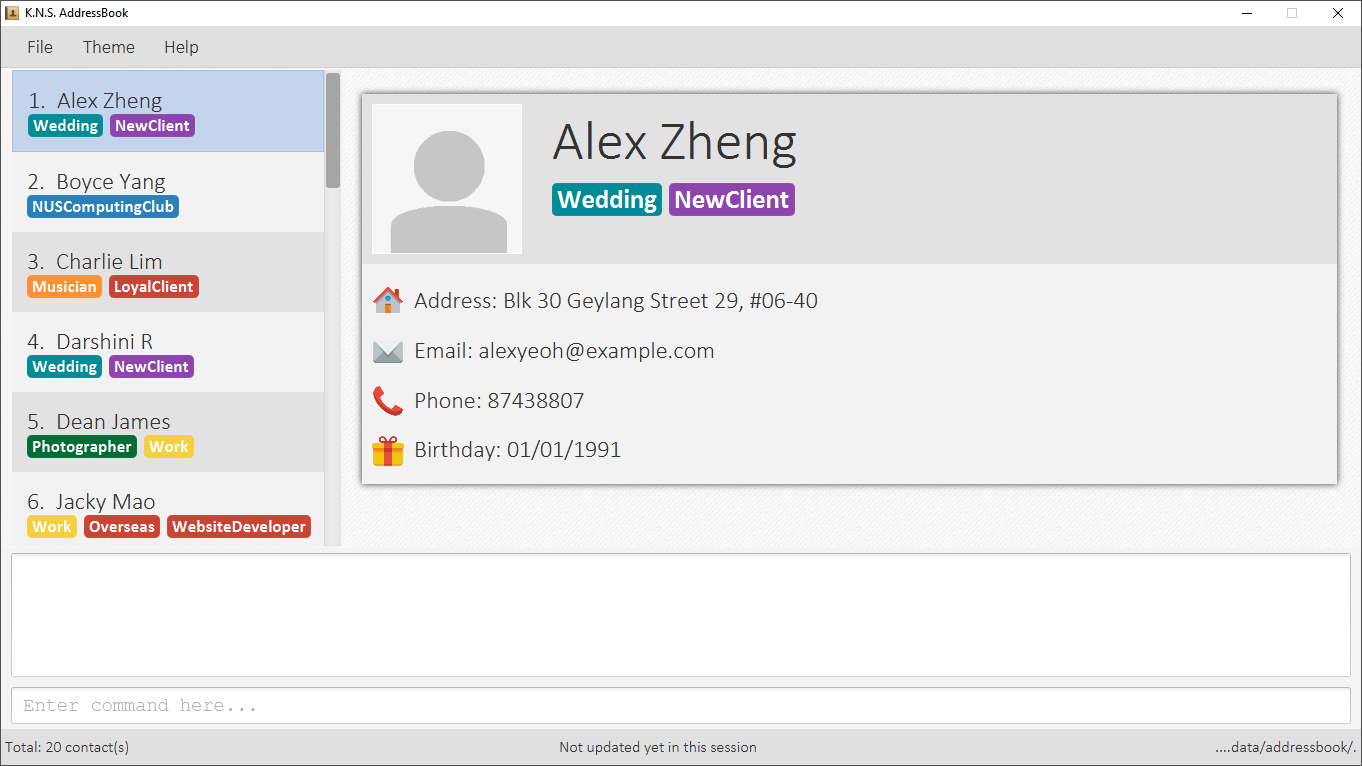
3.1. Person Panel
This is where you will find a selected contact’s information (name, address, phone number, etc.) displayed neatly on a single page. When you click on the currently displayed Avatar of the contact, a new window will pop-up like so:

When you click load, you will be given the option to select an image (either in .JPG or .PNG format) stored on
your computer. Afterwards, clicking save will let you replace the current Avatar of the contact.
In K.N.S. AddressBook v2.0, you can look forward to the following enhancements to Person Panel:
-
Notes: You can record down miscellaneous information (e.g. favourite food, pet peeves) about a contact.
-
Birthday Countdown & Reminders: You’ll always know whose birthday is coming up soon! You can also get a reminder in advance of a contact’s upcoming birthday; no more remembering and forgetting needed!
3.2. Theme Switcher
When you click on 'Theme' in the Menu Bar, you should see 5 preset themes that you can choose for K.N.S. AddressBook:
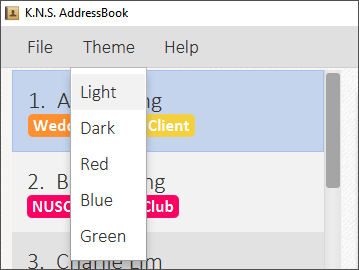
Alternatively, you can use the theme command to change the current display theme of K.N.S. AddressBook.
|
When running K.N.S. AddressBook for the first time, the Light theme is the default appearance setting. Clicking on any
of the other 4 preset themes will result in an immediate appearance change; hopefully one of these preset themes is to
your liking! Here is what K.N.S. AddressBook look’s like in all 5 preset themes:

In K.N.S. AddressBook v2.0, you can look forward to the following enhancements to Theme Switcher:
-
More Preset Themes: 5 preset themes is definitely not enough. We want you to have more appearance options so that K.N.S. AddressBook suits your style.
-
Custom Themes: For the more tech-savvy users, we plan to let you change the colours of K.N.S. AddressBook via import of Cascading Style Sheets (CSS).
3.3. Find by All Field
You can find your contact by using any field as the search query. For example, you can type in a phone number as the search query, and the contact in your address book who has that phone number will appear in the search result.
Find by all field supports find by name, phone number, email, address, birthday, and tags.
3.4. Saving the data
The Address Book’s data is saved in the hard disk automatically after any executable command that changes the data. There is no need for you to save manually.
4. Getting Started
4.1. Installation
-
If you have not done so, download and install Java version
1.8.0_60(or later) on your computer.This application will not work with earlier versions of Java 8 (anything before `1.8.0_60`). -
Download the latest
addressbook.jarrelease here. -
Copy the .jar file into any folder that you want to use as the home folder for your application.
-
Double-click the file to start the application. The Graphical User Interface (GUI) should appear in a few seconds as such:
And that’s all, you’re now ready to use K.N.S. AddressBook!
4.2. Layout Overview
Here are the parts of K.N.S. AddressBook that you should take note of:
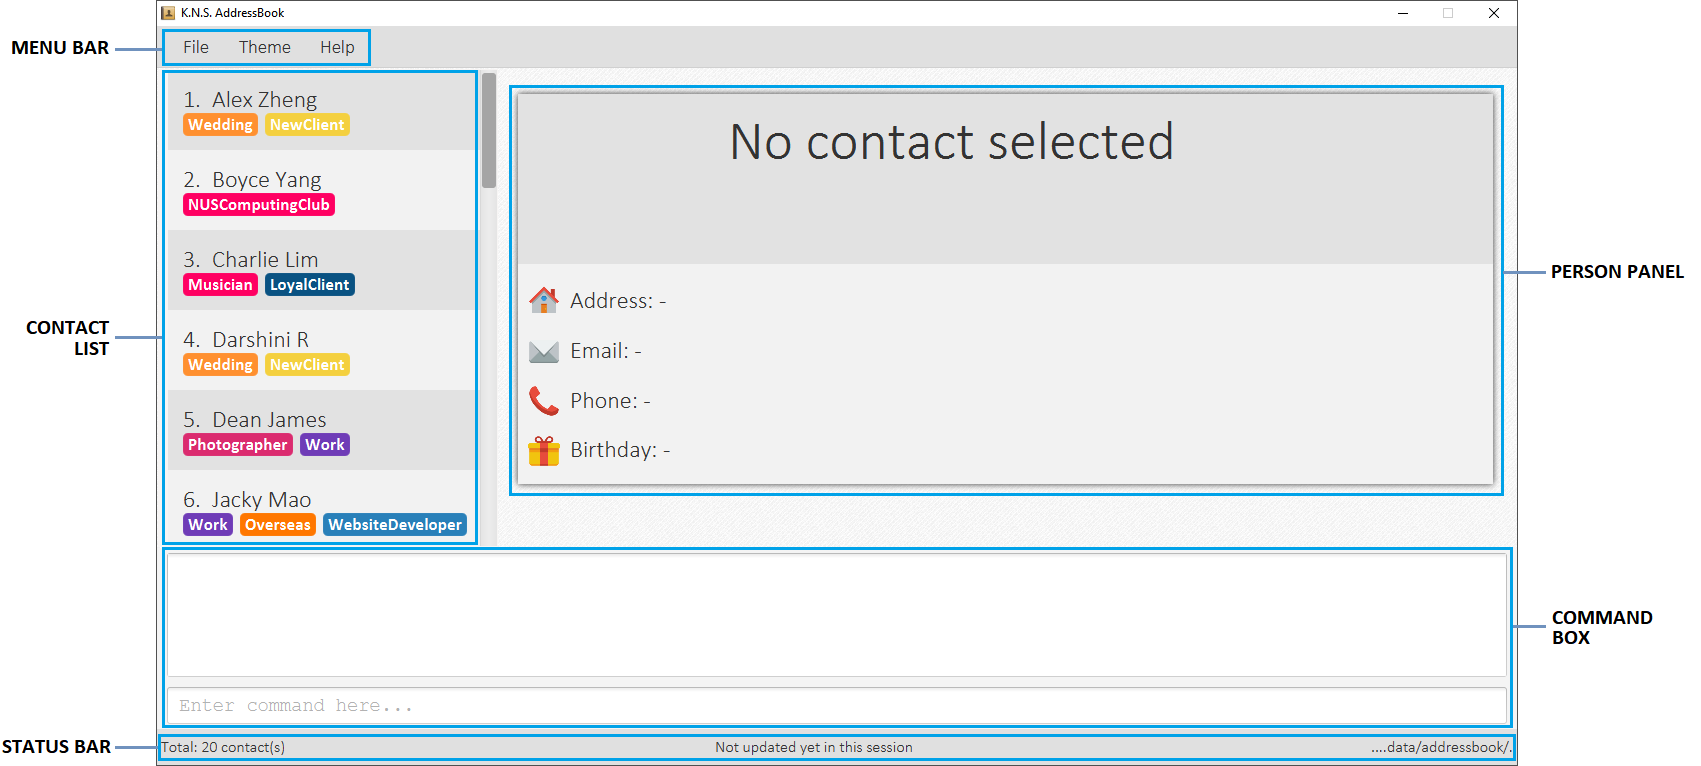
-
Menu Bar: This is where you can find the alternative ways to
-
Exitthe application, -
Change the current theme,
-
and open the
Helpwindow.
-
-
Contact List: You will find all your added contacts here. Only the name and tag(s) of your contacts will be shown here.
-
Person Panel: You can view all the saved information of a selected contact in the contact list here.
-
Command Box: Most of the interactions in K.N.S. AddressBook are done here. Here, you can type a valid
commandto get things done. -
Status Bar: The total number of contacts you have saved, the last updated timing, and the data path is shown here.
| The default window size of K.N.S. AddressBook is 1336 by 178. The window’s size cannot be changed or maximised! |
4.3. Warming Up
-
There are 20 example contacts that are already pre-loaded for you to get familiarised with the features and commands found in K.N.S. AddressBook. Clicking on any individual contact card will
selectit, showing you the contact’s details in the PersonPanel like so:
-
Let’s start off by clearing all these example contacts. Type the command
clearin the command box at the top, and press Enter. You should now see an empty Address Book as such: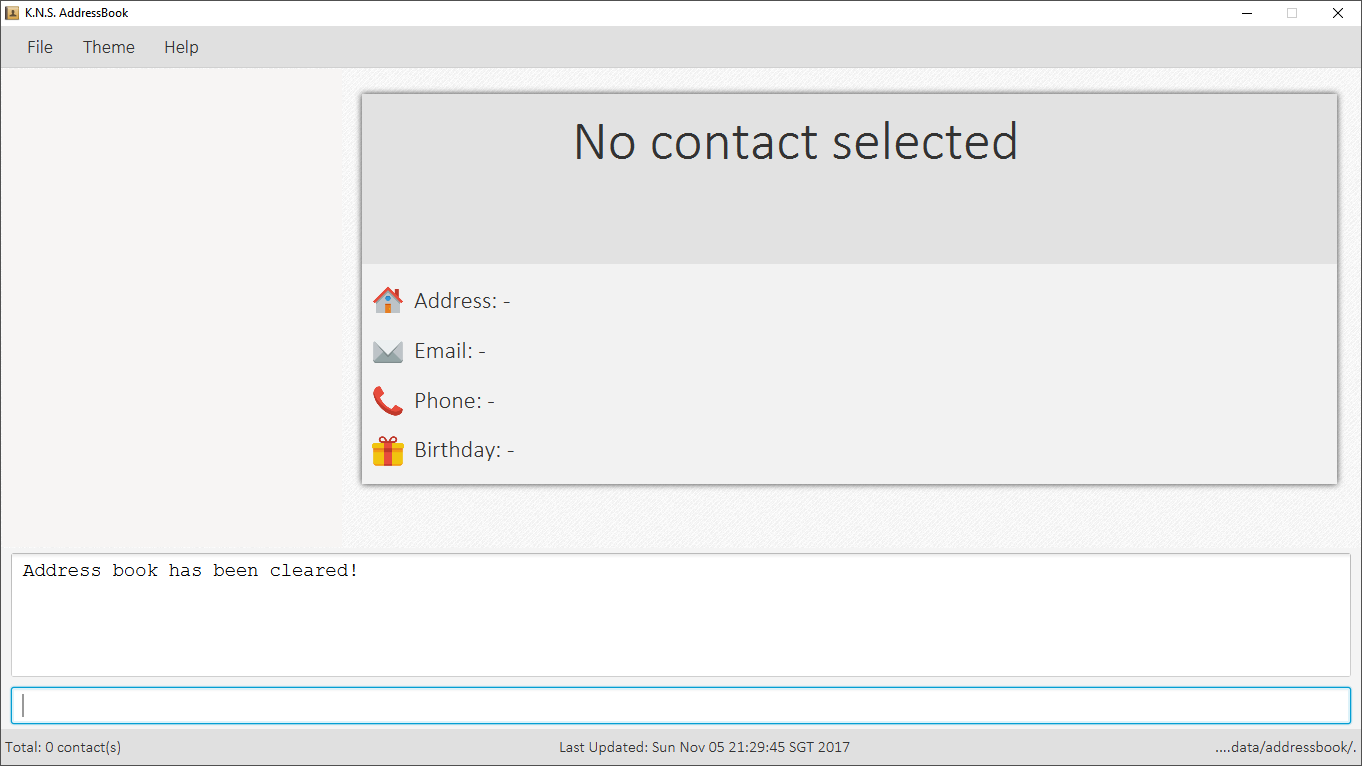
-
Now, you can add in your first contact! For example, type
add n/John Doe p/98765432 e/johnd@example.com a/JohnStreet
, Block 123, #01-01 b/01/01/1991 t/example
in the command box and press Enter. Click on the new contact; you should see the following: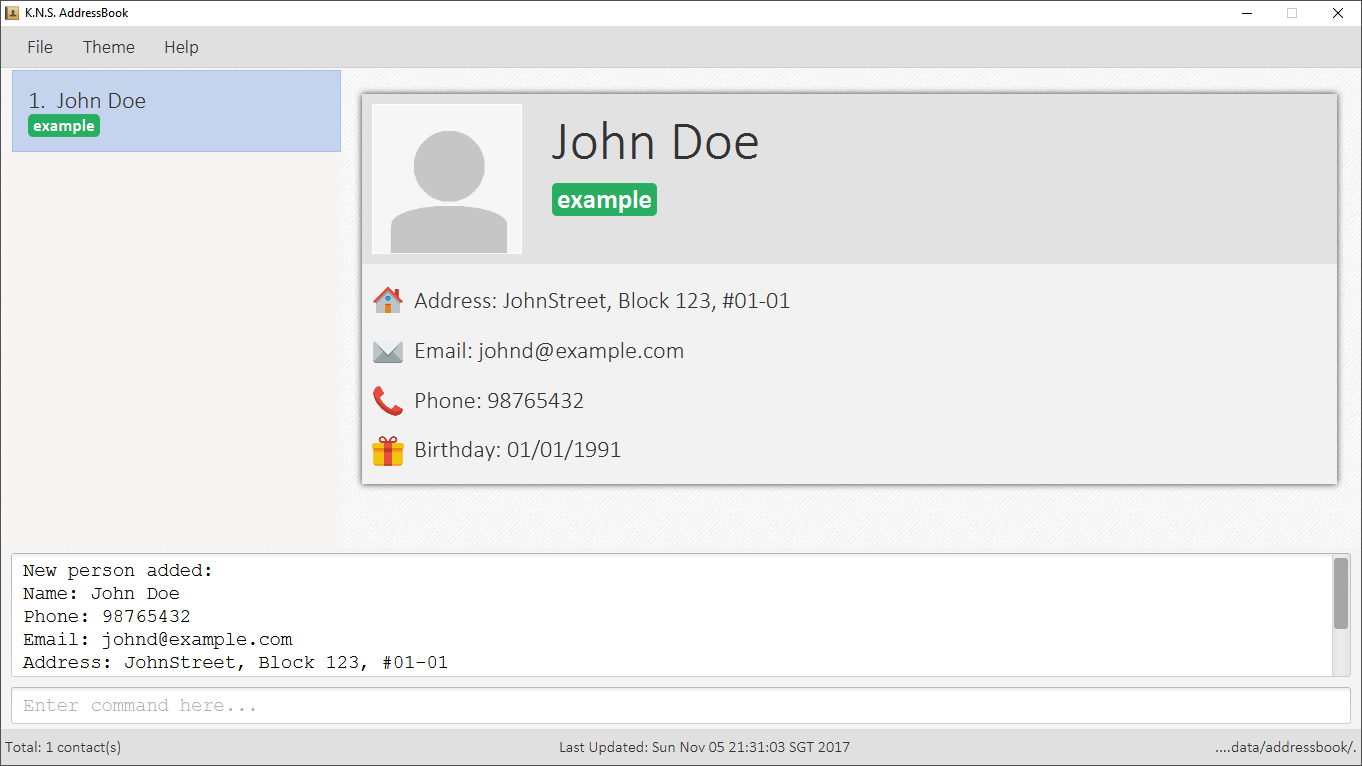
-
Uh oh! Looks like we did not type the correct name of the contact. To edit the name of the contact, type
edit n/
John Dow
in the command box and press Enter. You should now see the name change in the PersonPanel. -
It’s time for John to be gone from your Address Book. Type
delete 1and press Enter in order to remove him.Congratulations! You have now mastered the basic commands found in the application. In order to have a better understanding of all the available commands, you can check them out here.
5. Available Commands
There are 16 commands that you can use in K.N.S. AddressBook. Do take note of the following:
Command Format
-
Words in
UPPER_CASEare the parameters that you need to enter.-
e.g. For
add n/NAME,NAMEis a parameter which can be used asadd n/John Doe.
-
-
Items in square brackets are optional for you to fill in.
-
e.g
n/NAME [t/TAG]can be used asn/John Doe t/friend, or justn/John Doe.
-
-
Items with
… after them can be used multiple times (including zero times).-
e.g.
[t/TAG]…can be used ast/friend,t/friend t/familyetc.
-
-
You can enter parameters in any order.
-
e.g. If the command specifies
n/NAME p/PHONE_NUMBER, enteringp/PHONE_NUMBER n/NAMEinsteade also acceptable.
-
5.1. Viewing Help: help
Launches a small window that displays the user guide for your reference.
If you’re ever in need of help, or just curious to learn more about K.N.S you can use: help
This command will open up a help window that contains the guide you’re currently reading!
5.2. Adding a person: add or a
Adds a person to the address book.
To add a person to K.N.S, you can use the following command:
add n/NAME [p/PHONE_NUMBER] [e/EMAIL] [a/ADDRESS] [b/BIRTHDAY] [v/AVATAR] [t/TAG]… or a n/NAME [p/PHONE_NUMBER] [e/EMAIL] [a/ADDRESS] [b/BIRTHDAY] [v/AVATAR] [t/TAG]…
| You can add a contact with any number of tags (including 0). |
|
Only the name field is mandatory, all other fields are optional. With the exception of tags, all missing fields will have a placeholder value. |
Examples:
-
add n/John Doe p/98765432 e/johnd@example.com a/John Street, Block 123, #01-01 b/01/01/1991 -
a n/Betsy Crowe t/client e/betsycrowe@example.com a/Newgate Prison p/1234567 b/02/02/1992 t/criminal -
a n/Charlie Chopin t/boss e/charliec@example.com a/Madysun Triangle Park p/98765432 b/02/03/2000 v/C:\Users\Charlie\Pictures\cc.png -
add n/Johnny
5.3. Listing all persons: list or l
Shows a list of all persons in the address book.
To show all persons in your address book, simply enter:
list or l
5.4. Editing a person: edit or e
Edits an existing person in the address book.
To edit an existing person in your address book, you can use the command:
edit INDEX [n/NAME] [p/PHONE] [e/EMAIL] [a/ADDRESS] [b/BIRTHDAY] [t/TAG]… or e INDEX [n/NAME] [p/PHONE] [e/EMAIL] [a/ADDRESS] [b/BIRTHDAY] [v/AVATAR] [t/TAG]…
Examples:
-
edit 1 p/91234567 e/johndoe@example.com
Edits the phone number and email address of the 1st person to be91234567andjohndoe@example.comrespectively. -
e 2 n/Betsy Crower v/http://example.com/profile.png t/
Edits the name of the 2nd person to beBetsy Crower, change the avatar and clears all existing tags.
5.5. Adding a Tag: addtag or at
Adds tag(s) to an existing person in the address book.
Format: addtag INDEX TAG [MORE_TAGS]…
Examples:
-
addtag 1 owesMoney
Adds aowesMoneytag for the 1st person on the list. If previously the 1st person hasfriendstag, now the 1st person has bothfriendsandowesMoneytag. -
addtag 3 friends highSchool
Adds afriendstag and ahighSchooltag for the 3rd person on the list.
5.6. Deleting a Tag: deletetag or dt
Deletes given tag from an existing person in the address book.
Format: deletetag INDEX TAG [MORE_TAGS]…
Examples:
-
deletetag 1 owesMoney
Deletes theowesMoneytag from the 1st person on the list. -
deletetag 3 friends highSchool
Deletes thefriendstag andhighSchooltag from the 3rd person on the list.
5.7. Locating persons: find or f
To locate a person within your address book, you can use:
find [PREFIX]KEYWORD [MORE_KEYWORDS]… or f [PREFIX]KEYWORD [MORE_KEYWORDS]…
where prefix indicates the field to search (e.g. name) and keyword is the keyword to match with.
5.7.1. By Name
To find by name, you can either use the prefix n/ or no prefix at all.
When finding by name, the result will auto sort according to the position of the match. e.g. find Bo will list Bo Alex before Holbo and Holbo before Alexander Bo
|
Examples:
-
find n/ John
ReturnsjohnandJohn Doe -
f Johnis equivalent with above example. -
find Betsy Tim John
Returns any person having namesBetsy,Tim, orJohnor that starts with them (e.g.Timothy)
5.7.2. By Tag
To find by tag, you can use the prefix t/.
| When finding by tag, it will match person with any tag matching at least one of the keywords. |
Examples:
-
find t/ family
Returns any person with the tagfamily -
f t/ friends family colleague
Returns any person with at least one of the tagsfriends,family, orcolleague.
5.7.3. By Any Field
To find by other fields, you can use their respective prefixes. (p/ for phone, e/ for email, b/ for birthday,
a/ for address)
You can search all fields, save for avatar (v/) as of v1.4
All prefixes will show contacts with partial matches of the respective information.
Examples:
-
find p/ 1234567
Returns any person with phone number containing1234567. -
find a/ Jurong
Returns any person with address containingJurong(case-insensitive) in it. -
find b/ 16/02
Returns any person with birthday containing16/02. -
find e/ johndoe
Returns any person with email containingjohndoe.
5.7.4. Partial Matching
The Find command accepts partial matches by default.
Keywords will match entries if they are contained within those entries.
| However, vice-versa does not apply! i.e. Entries will not match keywords if the entries are contained within the keywords. |
Examples:
-
find mel
MatchesMelissaandAmelia -
find amelia
MatchesAmeliabut notMelissaorMel -
find leon
MatchesLeonardbut notLeo -
find t/ frien
Matches any person with a tag that containsfrien, e.g.FriendsorBestFriends
5.7.5. By Multiple Fields and Keywords
In development for v2.0
5.7.6. Strict Searching (AND search)
In development for v2.0
5.8. Deleting a person: delete or d
To remove a person from your address book, you can use: delete INDEX or d INDEX
Examples:
-
list
delete 2
Deletes the 2nd person in the address book. -
find Betsy
d 1
Deletes the 1st person in the results of thefindcommand.
5.9. Selecting a Person: select or s
Selects the person identified by the index number used in the last person listing.
Format: select INDEX or s INDEX
Examples:
-
list
select 2
Selects the 2nd person in the address book. -
find Betsy
s 1
Selects the 1st person in the results of thefindcommand.
5.10. Sorting your contact list: sort
If you want to view your current list in a better way, you can use the sort command to
sort the current list lexicographically by the given prefix, in the given order.
To sort the current list, you can use: sort [PREFIX] [ORDER]
Examples:
-
list
sort des
Sorts the list in reverse order of insertion (i.e. the previous list is now reversed) -
find t/ friends
sort n/
Sorts the resulting list from thefindcommand by name, in ascending order.
(i.e. the list is now a list of people who has a tag matching friends, sorted alphabetically by name.)
5.11. Changing Themes: theme
You can choose from 5 preset themes to change into: Light, Dark, Red, Blue, and Green.
| The theme names are not case-sensitive! |
Format: theme COLOUR or t COLOUR
Examples:
-
theme Dark -
theme RED -
t blue -
t GrEeN
5.12. Listing entered commands: history or h
Lists all the commands that you have entered in reverse chronological order.
Format: history or h
|
Pressing the ↑ and ↓ arrows will display the previous and next input respectively in the command box. |
5.13. Undoing previous command: undo or u
Restores the address book to the state before the previous undoable command was executed.
Format: undo or u
|
Undoable commands: those commands that modify the address book’s content ( |
Examples:
-
delete 1
list
undo(reverses thedelete 1command) -
select 1
list
u
Theucommand fails as there are no undoable commands executed previously. -
delete 1
clear
undo(reverses theclearcommand)
undo(reverses thedelete 1command)
5.14. Redoing the previously undone command: redo or r
Reverses the most recent undo command.
Format: redo or r
Examples:
-
delete 1
undo(reverses thedelete 1command)
redo(reapplies thedelete 1command) -
delete 1
redo
Theredocommand fails as there are noundocommands executed previously. -
delete 1
clear
undo(reverses theclearcommand)
undo(reverses thedelete 1command)
r(reapplies thedelete 1command)
r(reapplies theclearcommand)
5.15. Saving/Backing up your data: export or ex
Exports current address book data to a file with the specified filename in the data folder.
While K.N.S provides automatic data saving, you can still manually back up your data using the export command.
To export your data, you should type:
export or ex FILENAME.xml
where FILENAME is the name you want to give to the exported data.
This will export your current address book data into a file with the specified filename.
Exported data is saved in the data folder, which should be in the same folder as the application file, by default.
|
If a file with the filename you entered already exists in the data folder, it will be overwritten without warning!
|
Examples:
-
export backup.xml
Exports your data in thedatafolder asbackup.xml -
ex copy
Fails and will prompt you to add a.xmlto the end of the file name.
5.16. Importing data: import or i
Imports data from the file in the given filepath, and overwrite current address book data.
To import data from another application or your own backup data, you can use the import command with the format:
import or i FILEPATH
where FILEPATH is the relative filepath of the data to be imported. (Usually in the data folder)
The data file to be imported does not have to be a .xml file, as long as the its contents are correctly formatted.
|
|
When you import data, you cannot get your old data back once you close the application. (you can still use undo if you haven’t)It is recommended to backup using the export command first before importing.
|
Examples:
-
import data/backup.xml
Imports the data in the filebackup.xmlin thedatafolder which should be located in the same folder as the application. -
i copy
Imports the data in the filecopywhich should be located at the same folder as the application.
5.17. Clearing all entries: clear or c
Clears all entries from the address book.
To clear all entries from your address book, you can type:
clear or c
5.18. Exiting the program: exit
Exits the program.
To exit the program, you can use the command: exit
5.19. Set favourite contacts In development for v2.0
Favourite contacts will appear on the top of the contact list.
5.20. Contacting a person In development for v2.0
Directly calls or emails the person(s) identified by index number or otherwise.
6. Command Cheat sheet
If you’re in a hurry or just looking for a quick and simple overview, you’re in the right place! Here you can find the list of commands and how to use them:
| Action | Command | Alias | Format | Example |
|---|---|---|---|
Add |
|
|
|
Clear |
|
|
|
Delete |
|
|
|
Edit |
|
|
|
Add Tag |
|
|
|
Delete Tag |
|
|
|
Find |
|
|
|
List |
|
|
|
View Help |
|
|
|
Select |
|
|
|
Sort |
|
|
|
Change Theme |
|
|
|
History |
|
|
|
Undo |
|
|
|
Redo |
|
|
|
Export Data |
|
|
|
Import Data |
|
|
|
7. F.A.Q.
Q: How do I transfer my data to another Computer?
A: Install the application in the other computer and overwrite the empty data file it creates with the file that
contains the data of your previous Address Book folder.
Q: How often will this application get updated?
A: Every Wednesday, there will be a new release that you can download so that you can keep the application up-to-date.
However, do take note that updates will cease permanently on the 15 November 2017.
Q: How do I update the application?
A: Download the latest .jar file and replace the previous one that is placed in the root directory. That’s all you
need to do!
Q: I’m having problems with the application that are not addressed in this user guide. Where can I find help?
A: If you have a GitHub account, you can raise a new issue
here about your problem.
Q: Can I contribute in this project?
A: Yes, you can! We welcome pull requests. You can submit your pull request to our github repository.
Q: Is there a developer guide that I can refer to?
A: Yes! Click here to access it.
8. Glossary
-
Avatar: A picture representing a particular person in the address book.
-
Cascading Style Sheets (CSS): It is a style sheet language used for describing the presentation of a document written in a markup language.
-
Command Line Interface (CLI): It is an interface which users respond to a visual prompt by typing in a command on a specified line, receive a response back from the system, and then enter another command. This goes on back and forth.
-
Graphical User Interface (GUI): It is a graphical (rather than purely textual) user interface to a computer.
-
Java: It is a general-purpose computer programming language that is used in many products today. To learn more, click here.
-
Mainstream OS: Examples include Windows, Linux, Unix, Mac OS X.