By: Team W11-B3 Since: Sep 2017 Licence: MIT
1. Introduction
Hello there! If you came here by choice, then chances are that you are interested in how we have further adapted from the original source code (AddressBook-Level4 project) provided by the SE-EDU initiative. This developer guide provides information that will help you understand what features we have implemented, and how we have done so.
2. Table Of Contents
3. Setting Up
3.1. Prerequisites
Before you get stared, do ensure that you have the following installed on your computer:
-
Java SE Development Kit (JDK)
1.8.0_60or later You can download Java SE Development Kit here.This application will not work with earlier versions of Java 8 (anything before 1.8.0_60). -
IntelliJ Integrated Development Environment (IDE) You can download IntelliJ IDE here.
By default, IntelliJ has Gradle and JavaFx plugins installed; do not disable them! If you have disabled them, go to File>Settings>Pluginsto re-enable them.
Once you have installed the above, you can continue on with the next step.
3.2. Setting up the project in your computer
-
Fork this repository to your GitHub account, and clone the fork to your computer.
Don’t have a GitHub account? You can register for one here. -
Open IntelliJ (if you are not in the welcome screen, click
File>Close Projectto close the existing project dialog first) -
Set up the correct JDK version for Gradle
-
Click
Configure>Project Defaults>Project Structure -
Click
New…and find the directory of the JDK
-
-
Click
Import Project -
Locate the
build.gradlefile and select it. ClickOK -
Click
Open as Project -
Click
OKto accept the default settings -
Open a console and run the command
-
gradlew processResources(on Windows) -
./gradlew processResources(on Mac OS X/Linux)This will generate all resources required by the application and tests. You should see a
BUILD SUCCESSFULmessage.
-
3.3. Verifying the setup
-
In Intellij, right click on the
seedu.address.MainAppfile and clickRun MainApp().main. You should see the project building, and the application should start afterwards. Try a entering few commands in the application to ensure that the application is running. -
Run the tests to ensure they all pass.
3.4. Configurations to do before writing code
3.4.1. Configuring the coding style
This project follows oss-generic coding standards. IntelliJ’s default style is mostly compliant with ours but it uses a different import order from ours. To rectify this,
-
Go to
File>Settings…(Windows/Linux), orIntelliJ IDEA>Preferences…(Mac OS X) -
Select
Editor>Code Style>Java -
Click on the
Importstab to set the order-
For
Class count to use import with '*'andNames count to use static import with '*': Set to999to prevent IntelliJ from contracting the import statements. -
For
Import Layout: The order isimport static all other imports,import java.*,import javax.*,import org.*,import com.*,import all other imports. Add a<blank line>between eachimport
-
Optionally, you can follow the UsingCheckstyle.adoc document to configure Intellij to check style-compliance as you write code.
3.4.2. Setting up Continuous Integration (CI)
Set up Travis to perform CI for your fork. See UsingTravis.adoc to learn how to set it up.
Optionally, you can set up AppVeyor as a second CI (see UsingAppVeyor.adoc).
| Having both Travis and AppVeyor ensures your App works on both Unix-based platforms and Windows-based platforms (Travis is Unix-based and AppVeyor is Windows-based). |
3.4.3. Before coding
Before you start coding, do read the Architecture section below so that you can get a clearer sense of the overall design of the application. This will help you understand how the application works, and how your changes can affect the entire system.
3.4.4. Updating documentation to match your fork
Lastly, if you plan to develop this as a separate product (i.e. instead of contributing to the
CS2103AUG2017-W11-B3/main), you should replace the URL in the variable repoURL in DeveloperGuide.adoc and
UserGuide.adoc with your fork’s URL, and make changes to the documentation where necessary.
4. Design
4.1. Introduction: Architecture
The Architecture Diagram below explains the high-level design of the application:
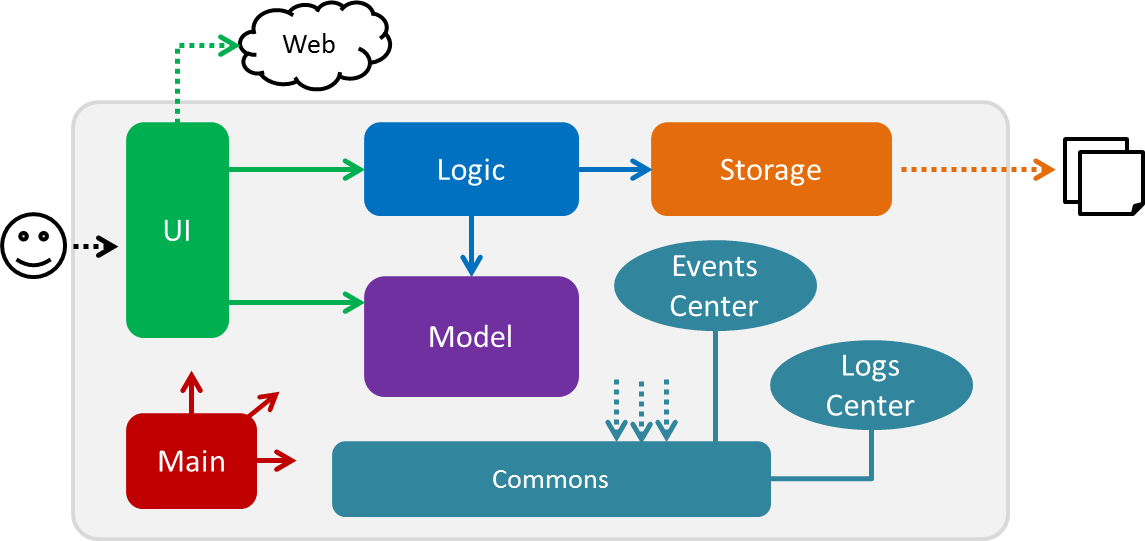
Figure 4.1.1: Architecture Diagram
4.1.1. Main Component
Main has only one class called MainApp. It is responsible
for,
-
At application launch: Initializes the components in the correct sequence, and connects them up with each other.
-
At shut down: Shuts down the components and invokes cleanup method where necessary.
4.1.2. Commons Component
Commons represents a collection of classes used by multiple other components. Two of those
classes play important roles at the architecture level:
-
EventsCenter: This class (written using Google’s Event Bus library) is used by components to communicate with other components using events (i.e. a form of Event Driven design) -
LogsCenter: Used by most classes to write log messages to the application’s log file.
4.1.3. The Other 4 Components
The rest of the App consists of four components:
Each of the four components
-
Defines its API in an
interfacewith the same name as the Component. -
Exposes its functionality using a
{Component Name}Managerclass.
4.2. Events-Driven nature of the design
4.2.1. Components Interaction
The Sequence Diagram below shows how the components interact for the scenario where the user issues the command
delete 1:
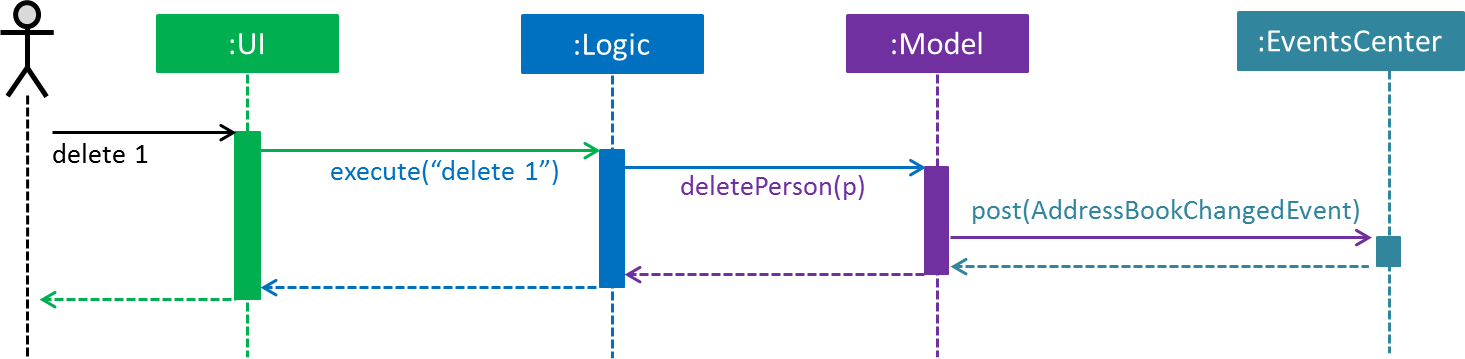
Figure 4.2.1.1: Component interactions for delete 1 command (part 1)
Model simply raises a AddressBookChangedEvent when the Address Book data is changed, instead of asking the Storage
to save the updates to the hard disk.
|
The diagram below shows how the EventsCenter reacts to that event, which eventually results in the updates being saved
to the hard disk and the status bar of the UI being updated to reflect the 'Last Updated' time.
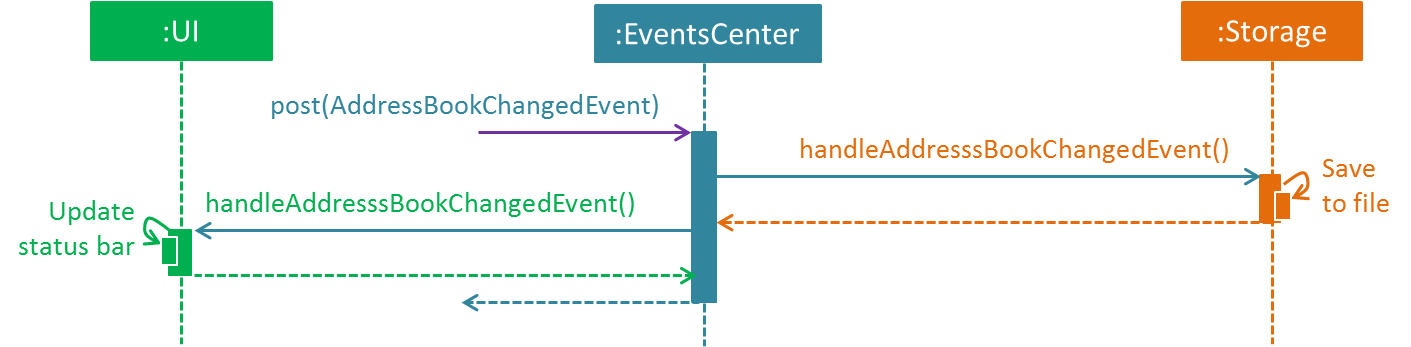
Figure 4.2.1.2: Component interactions for delete 1 command (part 2)
Note how the event is propagated through the EventsCenter to the Storage and UI without Model having to be
coupled to either of them. This is an example of how this Event Driven approach helps us reduce direct coupling between
components.
|
4.3. UI Component
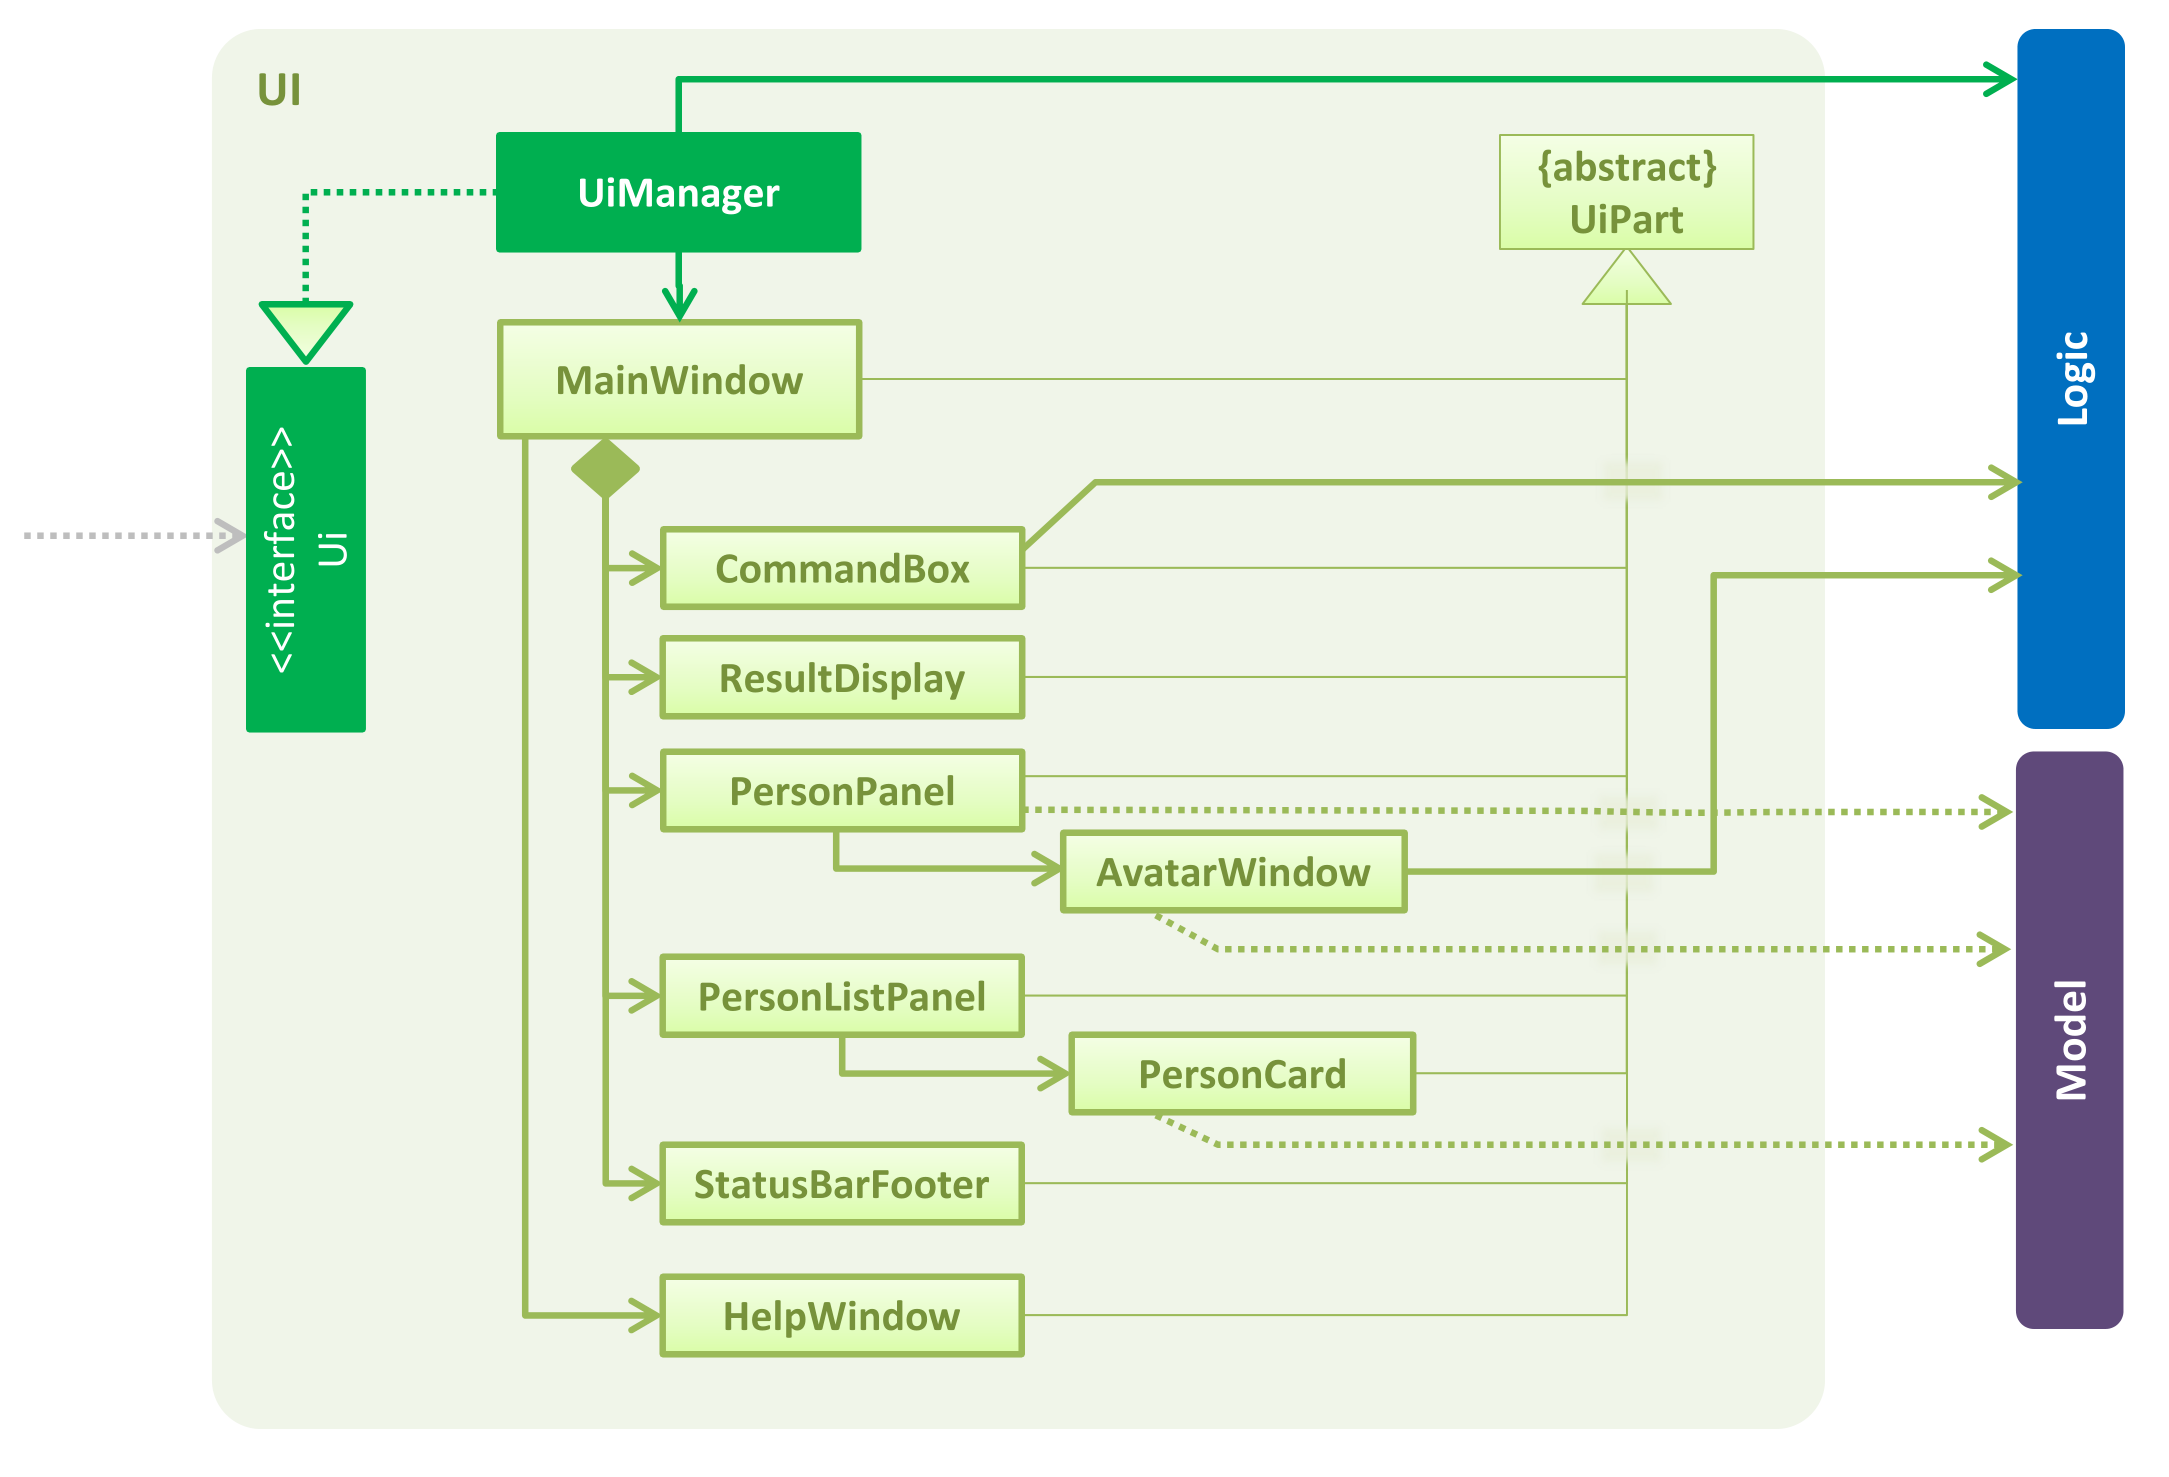
Figure 4.3.1: Structure of the UI Component
API: Ui.java
The UI consists of a MainWindow that is made up of parts e.g.CommandBox, ResultDisplay, PersonListPanel,
StatusBarFooter, BrowserPanel etc. All of these parts, including the MainWindow, inherit from the abstract UiPart class.
The UI component uses JavaFx UI framework. The layout of these UI parts are defined in matching .fxml files that are
in the src/main/resources/view folder. For example, the layout of the
MainWindow is specified in
MainWindow.fxml
The UI component,
-
Executes user commands using the
Logiccomponent. -
Binds itself to some data in the
Modelso that the UI can auto-update when data in theModelchange. -
Responds to events raised from various parts of the App and updates the UI accordingly.
4.4. Logic component
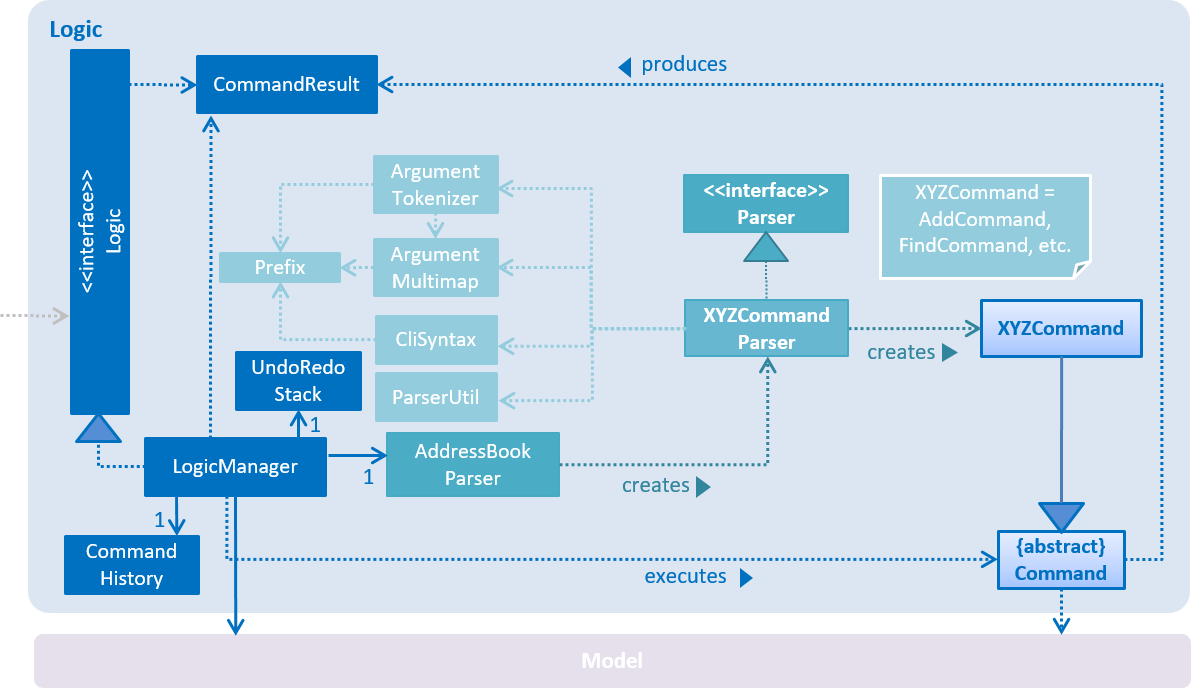
Figure 4.4.1: Structure of the Logic Component
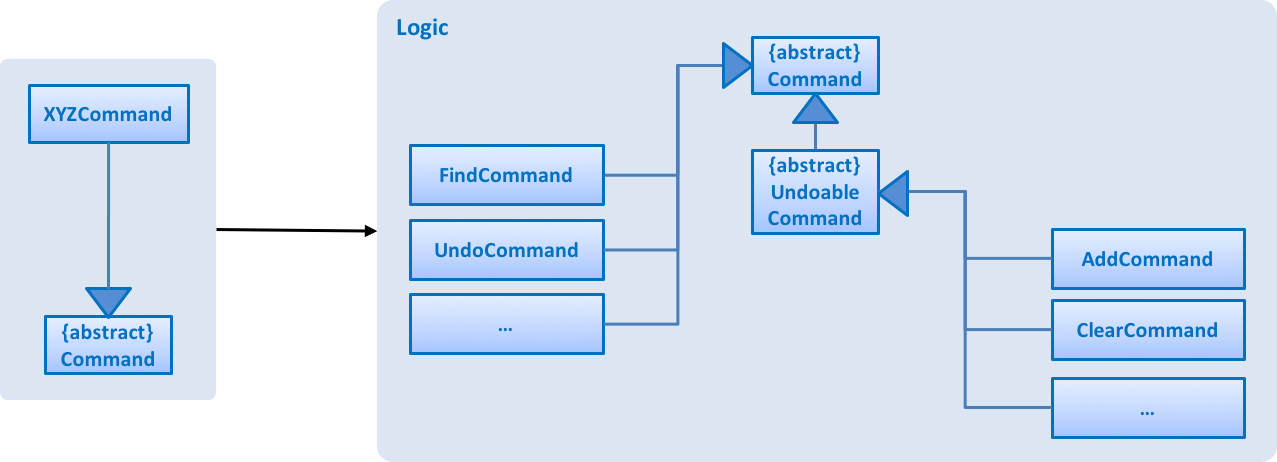
Figure 4.4.2: Structure of Commands in the Logic Component. This diagram shows finer details concerning XYZCommand
and Command in Figure 4.4.1
API:
Logic.java
-
Logicuses theAddressBookParserclass to parse the user command. -
This results in a
Commandobject which is executed by theLogicManager. -
The command execution can affect the
Model(e.g. adding a person) and/or raise events. -
The result of the command execution is encapsulated as a
CommandResultobject which is passed back to theUI.
Given below is the Sequence Diagram for interactions within the Logic component for the execute("delete 1")
API call:
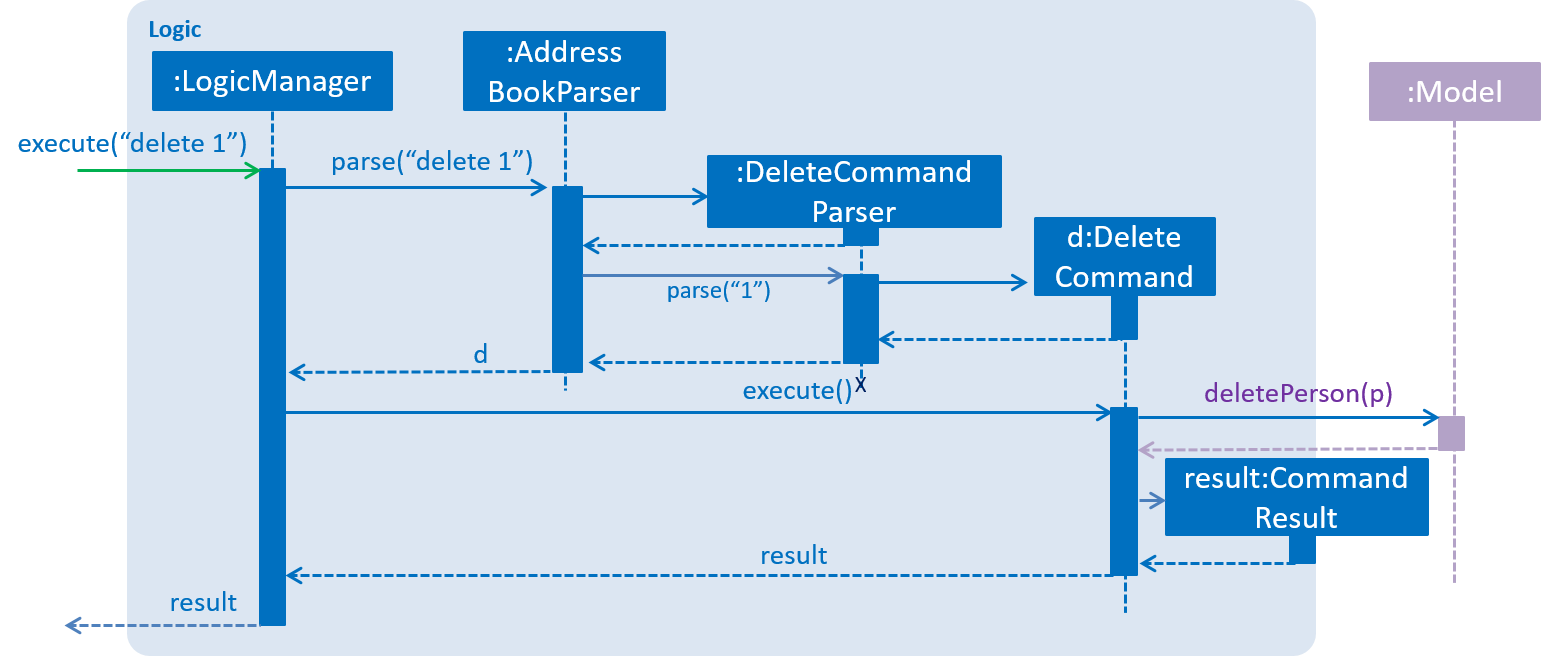
Figure 4.4.3: Interactions Inside the Logic Component for the delete 1 Command
4.5. Model Component
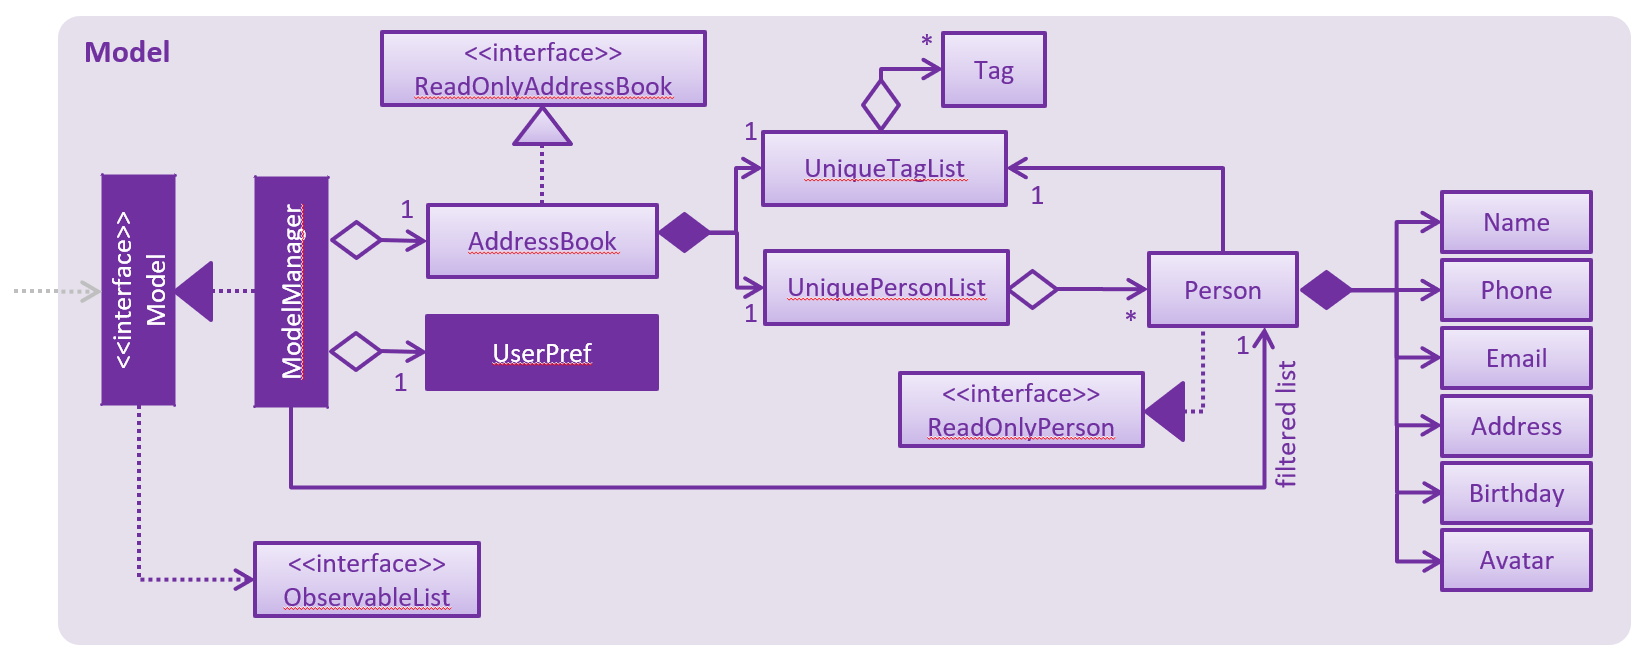
Figure 4.5.1: Structure of the Model Component
API: Model.java
The Model,
-
stores a
UserPrefobject that represents the user’s preferences. -
stores the Address Book data.
-
exposes an unmodifiable
ObservableList<ReadOnlyPerson>that can be 'observed' e.g. the UI can be bound to this list so that the UI automatically updates when the data in the list change. -
does not depend on any of the other three components.
4.6. Storage Component
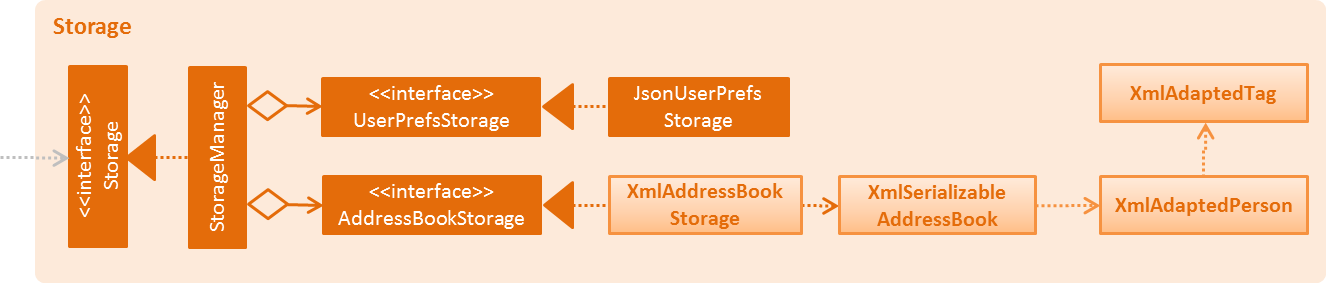
Figure 4.6.1: Structure of the Storage Component
API: Storage.java
The Storage component,
-
can save
UserPrefobjects in json format and read it back. -
can save the Address Book data in xml format and read it back.
4.7. Common Classes
Classes used by multiple components are in the seedu.addressbook.commons package.
The .pptx files used to create diagrams in this document can be found in the diagrams
folder. To update a diagram, just modify the objects inside .pptx file to your liking, and then Save as picture.
|
5. Implementation
This section describes some noteworthy details on how certain features are implemented.
5.1. Undo/Redo Mechanism
The undo/redo mechanism is facilitated by an UndoRedoStack, which resides inside LogicManager. It supports undoing
and redoing of commands that modifies the state of the address book (e.g. add, edit). Such commands will inherit
from UndoableCommand.
UndoRedoStack only deals with UndoableCommands. Commands that cannot be undone will inherit from Command instead.
The following diagram shows the inheritance diagram for commands:
Figure 5.1.1: Inheritance diagram for Undo/Redo command
UndoableCommand adds an extra layer between the abstract Command class and concrete commands that can be undone,
such as the DeleteCommand. Note that extra tasks need to be done when executing a command in an undoable way, such
as saving the state of the address book before execution. UndoableCommand contains the high-level algorithm for those
extra tasks while the child classes implements the details of how to execute the specific command. Note that this
technique of putting the high-level algorithm in the parent class and lower-level steps of the algorithm in child
classes is also known as the template pattern.
Commands that are not undoable are implemented this way:
public class ListCommand extends Command {
    @Override
    public CommandResult execute() {
        // ... list logic ...
    }
}
With the extra layer, the commands that are undoable are implemented this way:
public abstract class UndoableCommand extends Command {
    @Override
    public CommandResult execute() {
        // ... undo logic ...

        executeUndoableCommand();
    }
}

public class DeleteCommand extends UndoableCommand {
    @Override
    public CommandResult executeUndoableCommand() {
        // ... delete logic ...
    }
}
Suppose that the user has just launched the application. The UndoRedoStack will be empty at the beginning.
The user executes a new UndoableCommand, delete 5, to delete the 5th person in the address book. The current state
of the address book is saved before the delete 5 command executes. The delete 5 command will then be pushed onto the
undoStack. The current state is saved together with the command as shown:
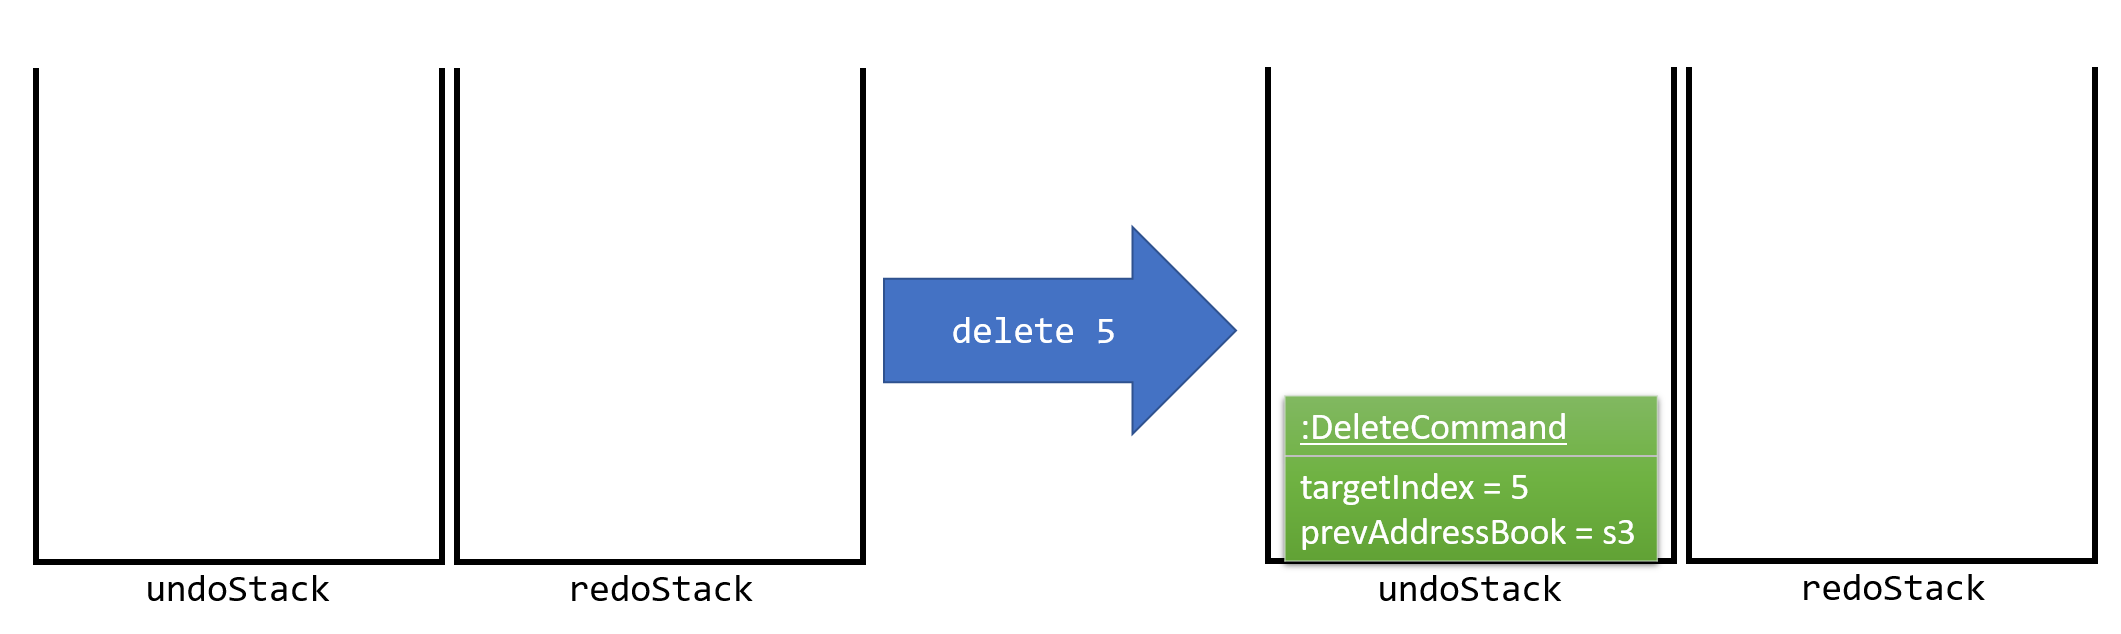
Figure 5.1.2
As the user continues to use the program, more commands are added into the undoStack. For example, the user may
execute add n/David … to add a new person like so:
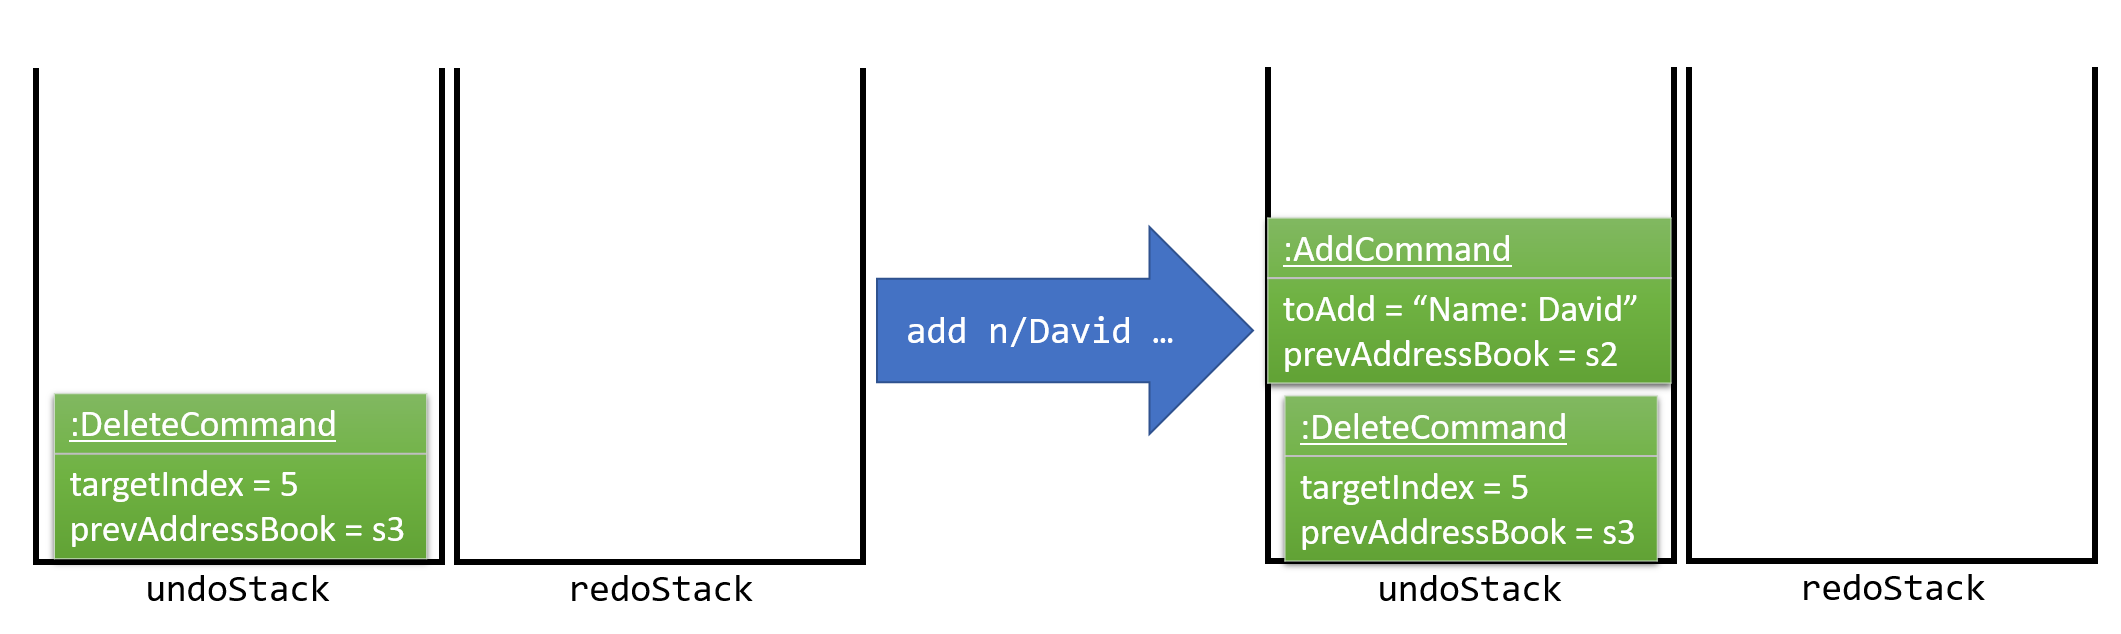
Figure 5.1.3
If a command fails its execution, it will not be pushed to the UndoRedoStack at all.
|
The user now decides that adding the person was a mistake, and decides to undo that action using undo.
We will pop the most recent command out of the undoStack and push it back to the redoStack. We will restore the
address book to the state before the add command executed as shown:
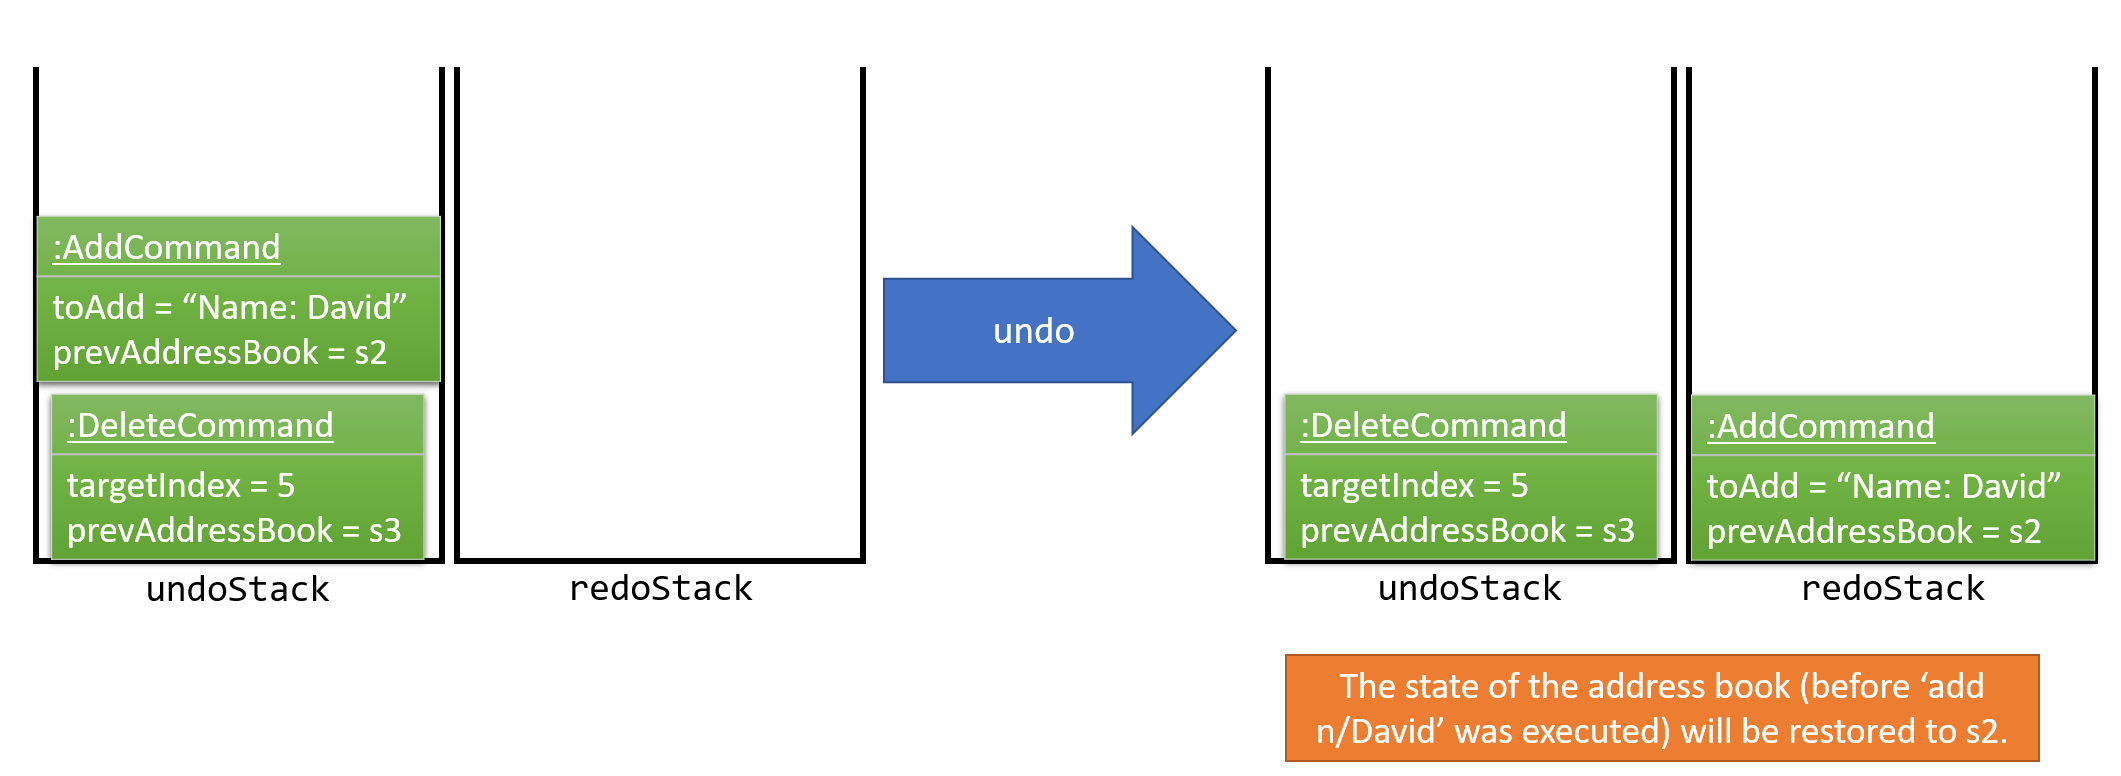
Figure 5.1.4
If the undoStack is empty, then there are no other commands left to be undone, and an Exception will be thrown when
popping the undoStack.
|
5.1.1. Sequence Diagram
The following sequence diagram shows how the undo operation works:
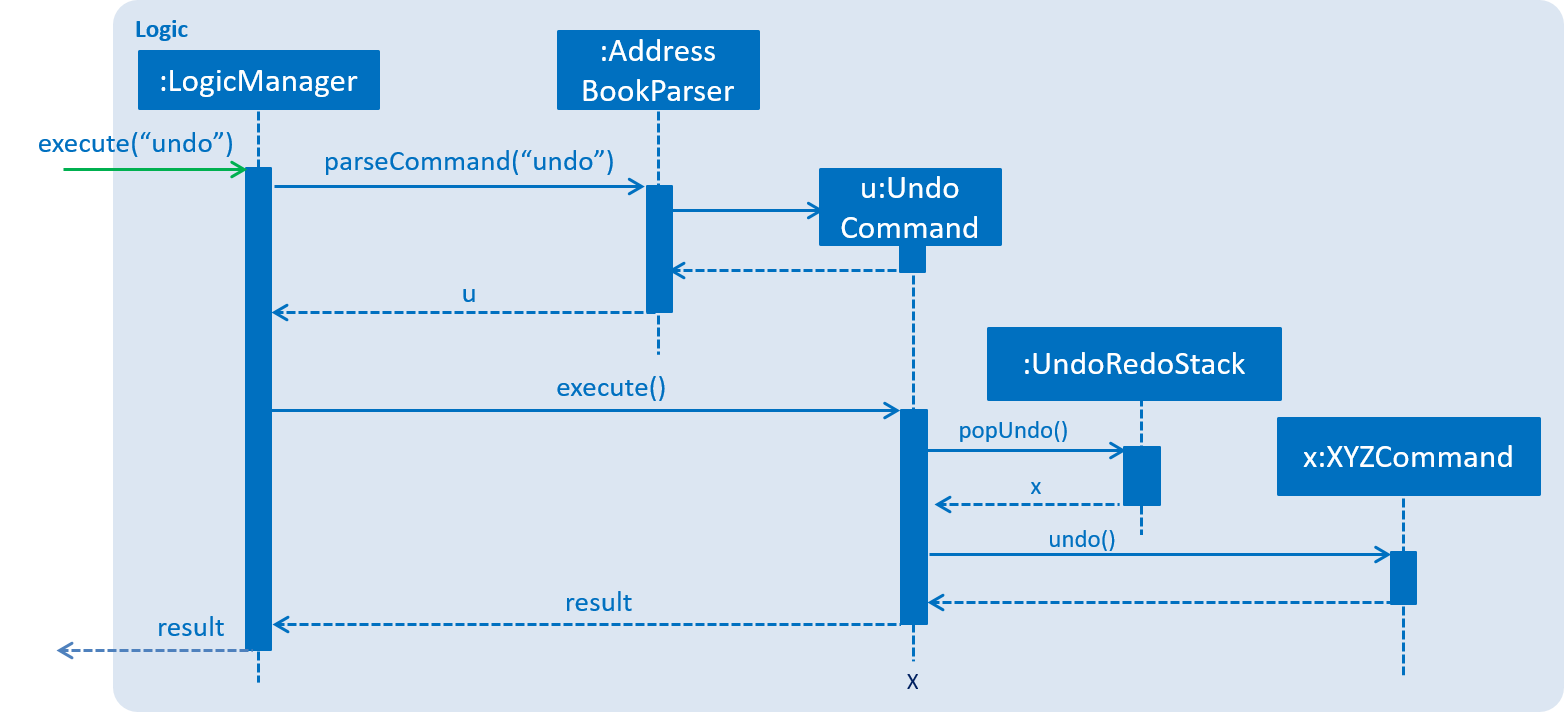
Figure 5.1.1.1
The redo does the exact opposite: pops from redoStack, push to undoStack, and restores the address book to the state
after the command is executed.
If the redoStack is empty, then there are no other commands left to be redone, and an Exception will be thrown when
popping the redoStack.
|
The user now decides to execute a new command, clear. As before, clear will be pushed into the undoStack. This
time the redoStack is no longer empty. It will be purged as it no longer make sense to redo the add n/David command
(this is the behavior that most modern desktop applications follow).
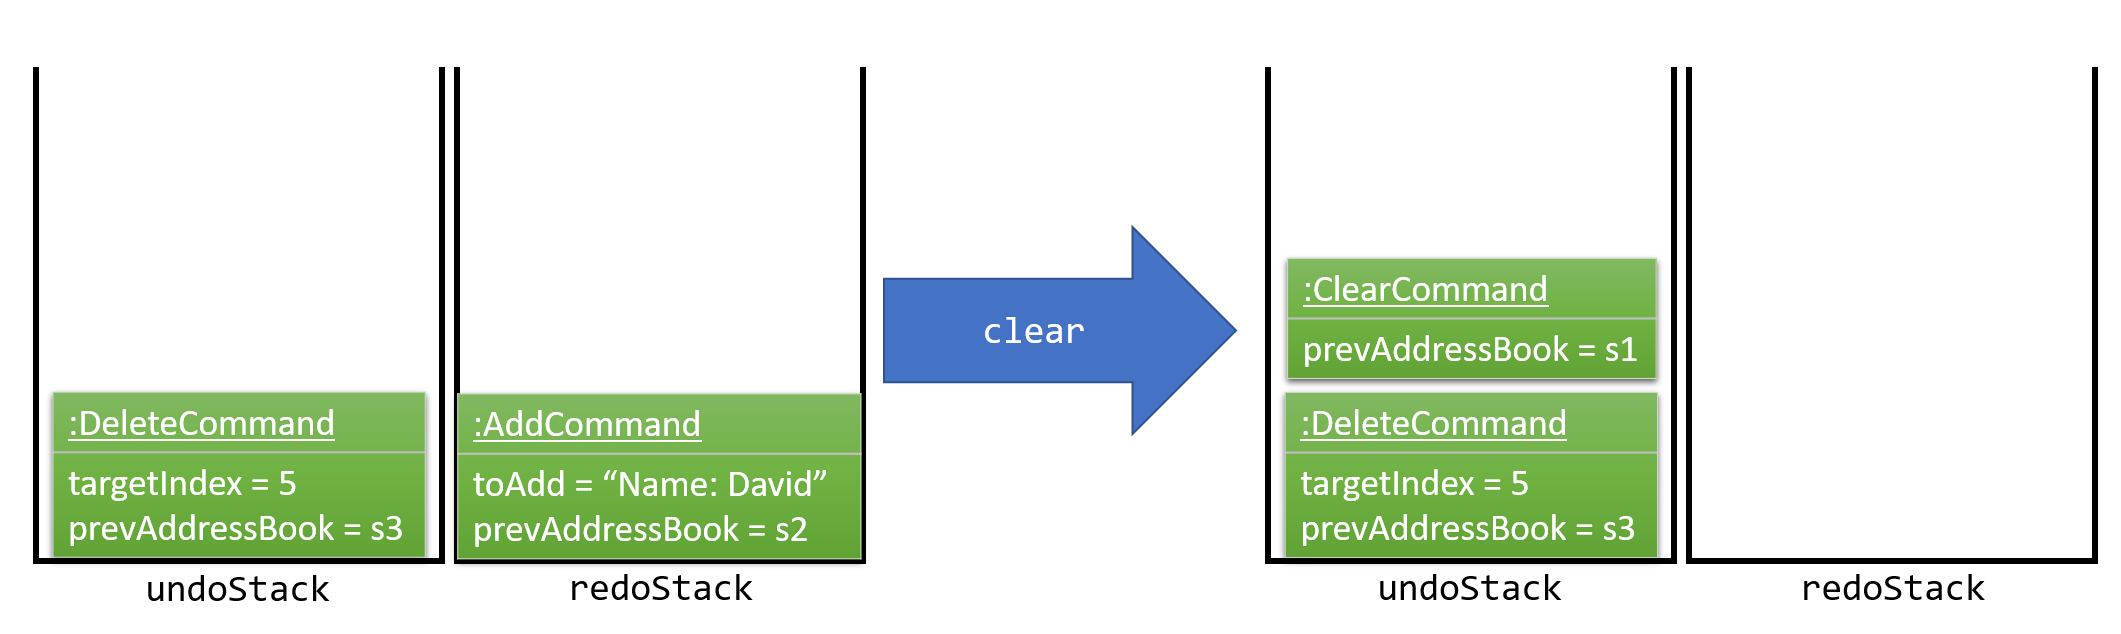
Figure 5.1.1.2
Commands that are not undoable are not added into the undoStack. For example, list, which inherits from Command
rather than UndoableCommand, will not be added after execution:
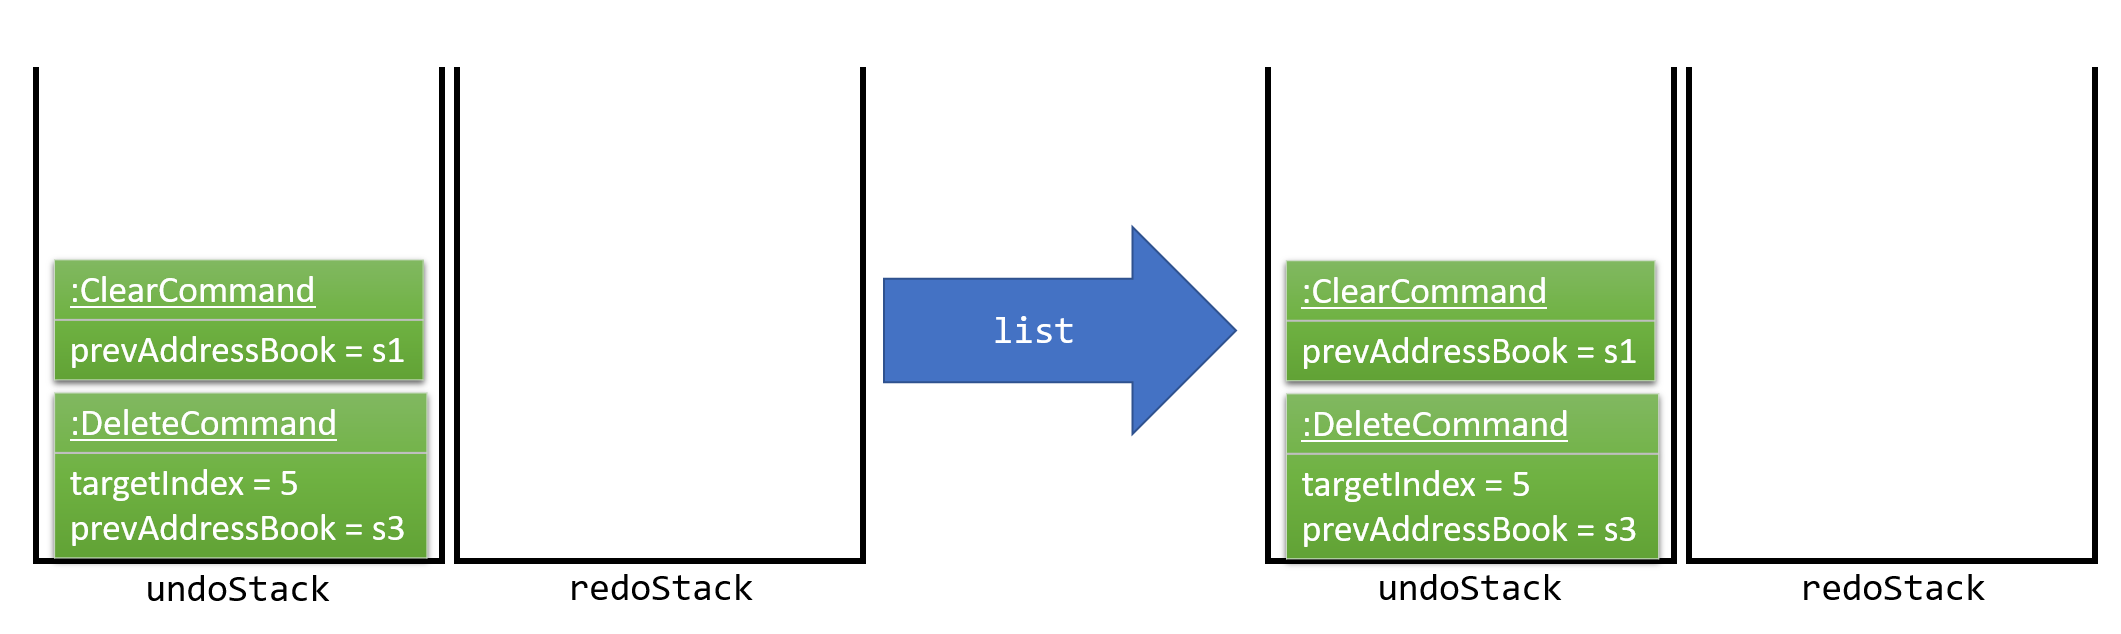
Figure 5.1.1.3
The following activity diagram summarize what happens inside the UndoRedoStack when a user executes a new command:
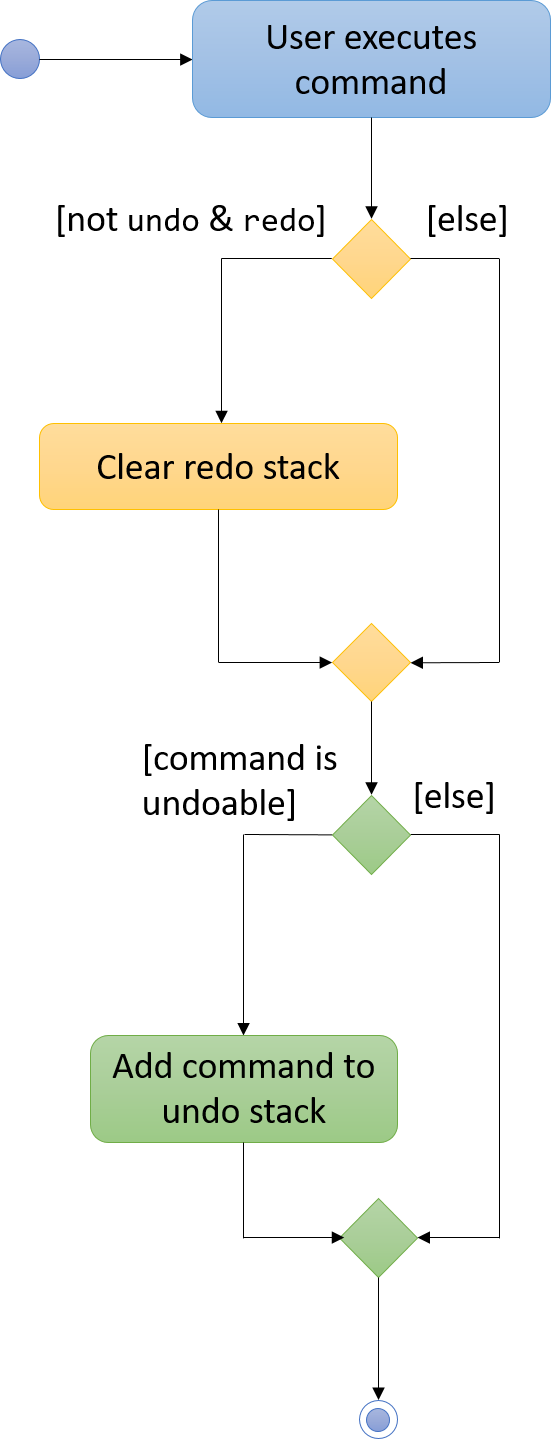
Figure 5.1.1.4
5.1.2. Design Considerations
Aspect: Implementation of UndoableCommand.
Alternative 1 (current choice): Add a new abstract method executeUndoableCommand().
Pros: We will not lose any undone/redone functionality as it is now part of the default behaviour. Classes that deal
with Command do not have to know that executeUndoableCommand() exist.
Cons: Hard for new developers to understand the template pattern.
Alternative 2: Just override execute().
Pros: Does not involve the template pattern, easier for new developers to understand.
Cons: Classes that inherit from UndoableCommand must remember to call super.execute(), or lose the ability to
undo/redo.
Aspect: How undo & redo executes.
Alternative 1 (current choice): Saves the entire address book.
Pros: Easy to implement.
Cons: May have performance issues in terms of memory usage.
Alternative 2: Individual command knows how to undo/redo by itself.
Pros: Will use less memory (e.g. for delete, just save the person being deleted).
Cons: We must ensure that the implementation of each individual command are correct.
Aspect: Type of commands that can be undone/redone.
Alternative 1 (current choice): Only include commands that modifies the address book (add, clear, edit).
Pros: We only revert changes that are hard to change back (the view can easily be re-modified as no data is
lost).
Cons: User might think that undo also applies when the list is modified (undoing filtering for example), only to
realize that it does not do that, after executing undo.
Alternative 2: Include all commands.
Pros: Might be more intuitive for the user.
Cons: User have no way of skipping such commands if he or she just want to reset the state of the address book and
not the view.
Additional Info: See our discussion
here.
Aspect: Data structure to support the undo/redo commands.
Alternative 1 (current choice): Use separate stack for undo and redo.
Pros: Easy to understand for new Computer Science student undergraduates to understand, who are likely to be the new
incoming developers of our project.
Cons: Logic is duplicated twice. For example, when a new command is executed, we must remember to update both
HistoryManager and UndoRedoStack.
Alternative 2: Use HistoryManager for undo/redo
Pros: We do not need to maintain a separate stack, and just reuse what is already in the codebase.
Cons: Requires dealing with commands that have already been undone: We must remember to skip these commands.
Violates Single Responsibility Principle and Separation of Concerns as HistoryManager now needs to do two different
things.
5.2. Person Panel
The PersonPanel replaces the previous BrowserPanel, and is a crucial part of MainWindow. It is an event-driven
component that displays contact information depending on the user’s actions
5.2.1. Java Implementation
By taking advantage of the java.util.logging package, PersonPanel is able to display all of the details of a contact
(name, address, email, contact number, birthday, avatar, tags) selected in PersonCard. This implementation can be
seen from the following 2 code snippets:
@Subscribe
private void handlePersonPanelSelectionChangedEvent(PersonPanelSelectionChangedEvent event) {
    loadBlankPersonPage();
    logger.info(LogsCenter.getEventHandlingLogMessage(event));
    selectedPersonCard = event.getNewSelection();
    selectedPerson = selectedPersonCard.person;
    isBlankPage = false;
    loadPersonPage();
}
Code Snippet 1 (handlePersonPanelSelectionChangedEvent()): Whenever a contact is selected, an event will be
triggered. The method will respond to the event by obtaining a PersonCard variable and ReadOnlyPerson variable
(which contains all the details of the contact), and pass it into loadPersonPage().
private void loadPersonPage() {
    name.setText(selectedPerson.getName().fullName);
    phone.setText("Phone: " + selectedPerson.getPhone().toString());
    address.setText("Address: " + selectedPerson.getAddress().toString());
    email.setText("Email: " + selectedPerson.getEmail().toString());
    birthday.setText("Birthday: " + selectedPerson.getBirthday().toString());
    avatar.setImage(SwingFXUtils.toFXImage(selectedPerson.getAvatar().getImage(), null));
    selectedPerson.getTags().forEach(tag -> {
        Label tagLabel = new Label(tag.tagName);
        tagLabel.setStyle("-fx-background-color: " + tag.tagColour);
        tags.getChildren().add(tagLabel);
    });
}
Code Snippet 2 (loadPersonPage()): The ReadOnlyPerson variable passed into loadPersonPage can then be used to
extract the contact’s details for display; the UI will be updated accordingly to reflect these changes.
| Upon opening the application, no contact details will be displayed since no contact has been selected yet. |
To better illustrate the code snippets, let us look at the following sequence diagram when a user selects a contact
found in PersonListPanel:
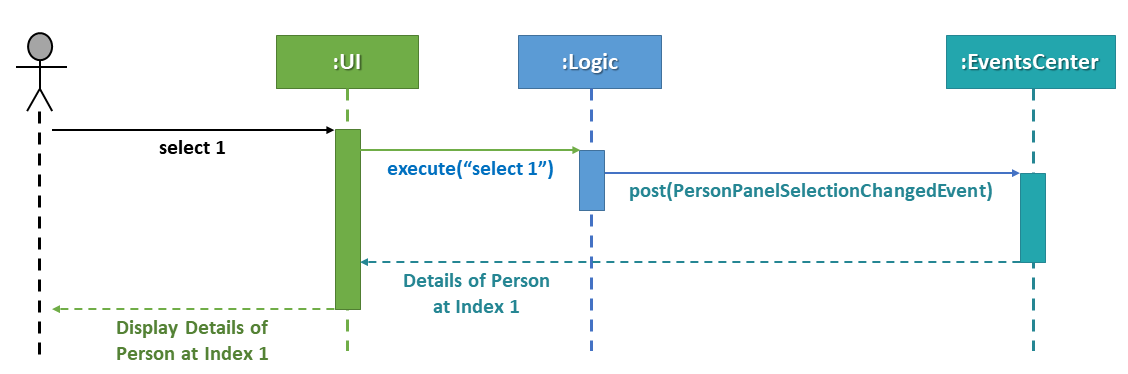
Figure 5.2.1.1: Sequence Diagram for Selection
When a contact in PersonListPanel is selected via command or mouse click, this will result in the EventsCenter
returning a ReadOnlyPerson of the selected contact for display in the PersonPanel.
5.2.2. Layout Implementation
The layout for PersonPanel is specified in PersonPanel.fxml. Visually, it can be broken down into 2 parts as shown:
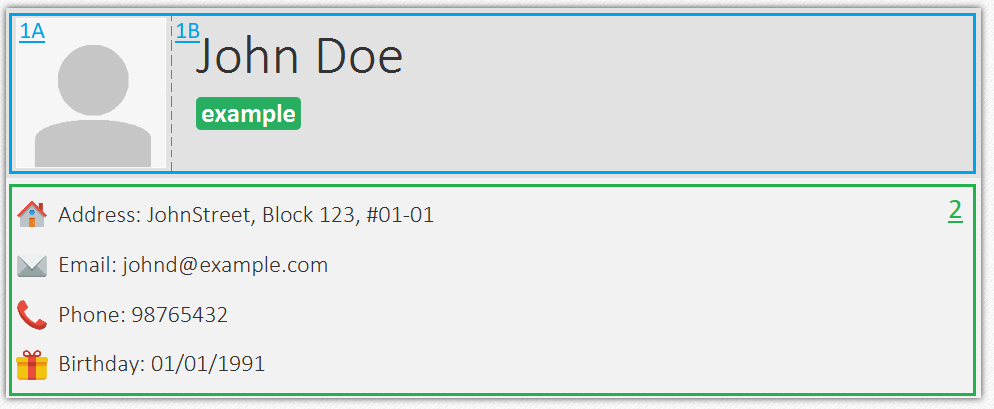
Figure 5.2.2.1: Visual Breakdown of PersonPanel
Part 1 (primaryDetails): This is subdivided into parts A and B. Part A contains the avatar picture of the contact.
Clicking on the avatar picture will cause a new AvatarWindow to be generated, which allows users to change the current
avatar picture of the selected contact. More information about the implementation of Avatar can be found in the next section.
Part B contains the Name and Tags of the contact, which we found to be important in recognising a displayed contact quickly. Hence, they are in a larger font in order to stand out.
Part 2 (secondaryDetails): This displays the Address, Email, Contact Number and Birthday of the contact. As these details are less important than the Name and Tags, they are placed below and are in a smaller font. At the moment, this section appears simple but empty. We plan to implement more features for v2.0, such as a "Notes about Contact" and "Birthday Countdown".
5.2.3. Design Considerations
Aspect: Display of Contact’s Details.
Alternative 1 (current choice): Replace BrowserPanel with PersonPanel, which displays all of the contacts details.
Remove all details but Name and Tags from PersonCard.
Pros: We can build upon PersonPanel and add more features to it, that the BrowserPanel could not achieve.
Cons: PersonPanel will not be able to display personal web pages (e.g. Contact’s Social Media page).
Alternative 2: Keep BrowserPanel and use HTML files to display contact details instead.
Pros: No need to modify existing code; instead just figure out a way to edit and display HTML files that show the
contact’s details.
Cons: May take too long to implement since we are not familiar with how we can do so.
Aspect: Display of Tags In PersonPanel (and PersonCard).
Alternative 1 (current choice): Randomly colourise tags to make them distinct.
Pros: Quick to implement and makes it easier for user to differentiate between tags.
Cons: Tags are always changing colour for each new instance of the application; may seem confusing.
Alternative 2: Keep the previous blue colour for all tags.
Pros: Consistent and simple; no work is needed to be done.
Cons: Takes users a longer time to differentiate between tags.
Aspect: Addition of Icons for secondaryDetails.
Alternative 1 (current choice): Place icons on the left of each contact detail.
Pros: Quick to implement and makes it easier for user to differentiate between each contact detail. Icons can be
easily taken from Google’s Material Design (or any other design website).
Cons: If we were to include more contact details (e.g. social media links) in the future, then we would have to
keep adding more icons; relevant icons may not be found on Google’s Material Design.
Alternative 2: Use different colours for each contact detail.
Pros: Even more quick to implement since it only involves CSS changes.
Cons: Bad idea design-wise because it violates the Triadic Colour Scheme. It could make
the application look less professional and unattractive.
5.3. Avatar
The Avatar class is a new contact detail that displays a display picture obtained
via a valid Uniform Resource Locator (URL) or a local directory path in your computer.
If no display picture is assigned to the contact, then creates a default placeholder image.
In order for the user to upload an Avatar for the contact, he/she can use the Add/Edit command or Graphical
User Interface (GUI) upload (AvatarWindow) to do so.
5.3.1. Java Implementation: Avatar
The display and storage of Avatar can be seen in the following code snippets:
public Avatar() {
    AvatarUtil placeholder = new AvatarUtil();
    image = placeholder.getPlaceholderAvatar();
    value = DEFAULT_VALUE;
}
Code Snippet 1 (Avatar()): The default constructor for Avatar is used when no display
picture is assigned to a newly added contact. The default placeholder Avatar is generated
with the dependant class AvatarUtil.
public Avatar(String url) throws IllegalValueException {
    try {
        if (url.isEmpty() || DEFAULT_VALUE.equals(url)) {
            AvatarUtil placeholder = new AvatarUtil();
            image = placeholder.getPlaceholderAvatar();
            value = DEFAULT_VALUE;
        } else {
            File defaultAvatar = new File(url);

            if (isValidUrl(url)) {
                this.url = new URL(url);
            } else {
                this.url = defaultAvatar.toURI().toURL();
            }
            this.image = ImageIO.read(this.url);
                        // Code Continued in Snippet 2B
Code Snippet 2A (Avatar(String url)): If a URL or local directory path string is provided,
then the parameterized constructor will check if the provided string is valid or not. If the string
is valid (i.e. non-empty and existing), then it will parse the URL and read the image given.
            if (!isSavedInData(url)) {
                String outputName = "/data/" + this.image.hashCode() + ".png";
                File outputImage = new File(System.getProperty("user.dir") + outputName);

                File parentDirectory = outputImage.getParentFile();
                if (!parentDirectory.exists()) {
                    parentDirectory.mkdirs();
                }

                ImageIO.write(this.image, "png", outputImage);
                this.url = outputImage.toURI().toURL();
            }
            this.value = this.url.toString();
        }
    } catch (Exception e) {
        throw new IllegalValueException(MESSAGE_AVATAR_CONSTRAINTS);
    }
}
Code Snippet 2B (Avatar(String url)): If the image given has not yet been stored in the data
directory, it will generate a new file and save it.
To better illustrate the code snippets, here is a sequence diagram when a user changes a person’s avatar with a new image (that is not currently stored in the data folder):
Figure 5.3.1.1: Sequence Diagram for Changing Avatar
Changing the Avatar of a contact will result in an immediate display change to the user.
|
5.3.2. Dependant Class: AvatarUtil
AvatarUtil generates a default placeholder image if the contact is not given a display picture. It relies
on the java.awt library to generate a picture drawn by the methods found in Graphics2D and Color.
You can find the full implementation of AvatarUtil in the folder java/seedu/address/commons/util.
|
5.3.3. Dependant Class: AvatarWindow
AvatarWindow is a UI component and is triggered when the current avatar of a contact is clicked on as such:

Figure 5.3.3.1: Avatar Window Pop-up
A window will appear for the user to load and save a picture from the computer. If a valid picture is loaded and saved,
it will create an Edit command and raise a new event; this event is the same as typing an actual valid edit command,
and can also be undone or redone as per normal.
You can find the full implementation of AvatarWindow in the folder java/seedu/address/ui.
|
5.3.4. Design Considerations
Aspect: Additional ways of changing Avatar.
Alternative 1: Only allow user to use the Add and Edit commands to change the Avatar of the contact.
Pros: No time is spent to make new ways of changing Avatar.
Cons: May be stifling for users who want to have a GUI option.
Alternative 2 (current choice): Create a GUI alternative for users to change the Avatar of the contact.
Pros: Makes the application more user friendly; easier for users to point and click instead of copying the
picture’s directory path, which may take a longer time.
Cons: Some classes (e.g. PersonCard, PersonPanel, etc.) have to be modified in order to implement this option.
Aspect: Saving of pictures.
Alternative 1: Save the pictures within the .jar file.
Pros: Users will not be able to modify the pictures downloaded; lesser chances of error exceptions occuring due
to missing files.
Cons: May be inconvenient for a user who would want to manipulate these pictures directly for any purpose.
Alternative 2 (current choice): Save the pictures outside of the .jar file, inside the data/ folder.
Pros: Users will be able to directly access downloaded pictures and manipulate them as they please.
Cons: If users are not careful (e.g. permanently.delete a picture by mistake), the contact’s avatar may get
replaced by the default placeholder.
5.4. Import & Export Mechanism
The import and export mechanism is implemented using the XmlAddressBookStorage class. It allows for the manual saving and loading of the
address book data, aside from the default initial loading and automatic saving, by using the export and import command.
Import only changes the address book’s data, and does not change the user preference. Notably, it does not change
the default file which the application automatically saves to, which is addressbook.xml. Instead, it overwrites the current data with
the data in the given filepath, provided it is a valid address book data.
The following shows the dependencies of both ImportCommand and ExportCommand:
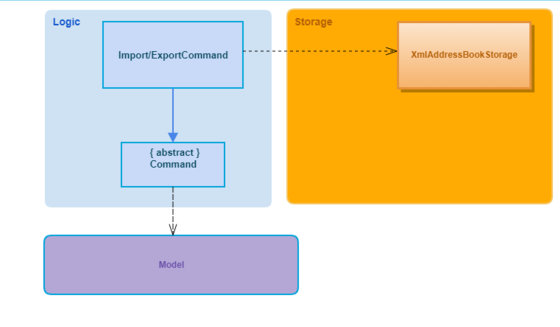
Figure 5.4.1: Import/Export Association Diagram
If the XmlAddressBookStorage fails to read or write to file, an Exception will be thrown.
The same will happen if the file contains persons with illegal values. (e.g. empty name)
|
Suppose the user has just initialized the application, and the data folder is empty.
The user makes some changes to the data (e.g. using clear and add to clear away the sample and add their own contacts) which
saves the data in the data folder as addressbook.xml automatically.
Then, without altering the data any further, the user decides to save a manual backup using a export backup.xml command.
This will create a backup.xml file in the data folder, which at this point is equivalent to the addressbook.xml.
As the user continues to alter the data, the addressbook.xml file will keep changing, and will be different than the backup.xml
file.
The user then decides that they want to return the addressbook to their backup version using a import data/backup.xml command.
This will overwrite the current data with the data in backup.xml, making it once again equivalent to addressbook.xml
5.4.1. Sequence Diagram
The sequence diagram for the command export a.xml is the following:
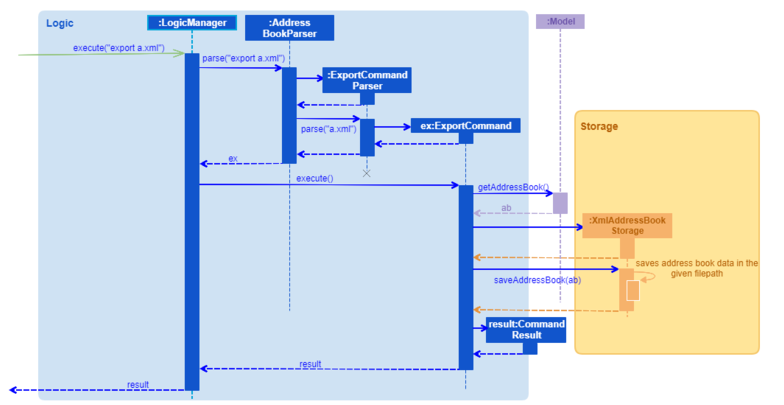
Figure 5.4.1.1: Sequence Diagram for Export Command
An import command would be similar, except that it creates a XmlAddressBookStorage object first, calls the readAddressBook method, and then
calls the resetData method from the Model object.
5.4.2. Design Considerations
Aspect: How import works
Alternative 1(current choice): Overwrite the current address book with the data from the given file.
Pros: Easier implementation, data in the given file is preserved.
Cons: Loses the current address book data, which cannot be recovered if the address book is closed. (Can still be recovered with undo if it has not been closed since the import yet)
Alternative 2: Switch the file that the address book uses to the given file, and save all changes to that file
Pros: Allows for easier use of multiple saved files. The data in the current (before import) file is preserved.
Cons: Harder implementation, does not provide an easy way to import backups, since all changes are saved to the given file.
Aspect: Scope of data to export and import
Alternative 1(current choice): Exports and imports only the address book data, excluding pictures and user preferences.
Pros: Can use the current XmlAddressBookStorage class to read and write. Only read and write a single file.
Cons: Excluding pictures means user have to manually backup pictures, otherwise address book is incomplete (no avatar).
Alternative 2: Include pictures and/or user preferences
Pros: More complete data storage.
Cons: Higher probability of accidentally overwriting files if the user is not careful.
5.5. Sorting viewable list
The sort command and auto-sorting of the find command is facilitated by a SortedFilteredList inside the ModelManager class. This list is created on top of
the FilteredList that is used to filter the contact list. A Comparator called defaultSortOrder was also created to as a
comparator to reset the sorted list to its default order. ModelManager was also modified to support updating the sorted list only,
and to always reset to default order whenever the filtered list is updated.
Commands that changes the viewable list without any sorting are implemented as:
public class ListCommand extends Command {
    @Override
    public CommandResult execure() {
        // ... some logic ...
        model.updateFilteredList(some predicate);
        // ... more logic ...
    }
Whereas commands with sorting (e.g. find) is implemented as:
public class FindCommand extends Command {
    @Override
    public CommandResult execute() {
        // ... some logic ...
        model.updateFilteredList(some predicate);
        model.updateSortedFilteredList(some comparator);
        // ... more logic ...
    }
5.5.1. Auto-Sort of Find Command
The find command, when matching by name, sorts its resulting list by the earliest position of a match with a given keyword.
This is implemented by creating a earliestIndexOf method in the StringUtil class, which takes in a sentence and a list of keywords, and returns the earliest starting index where a part of the sentence matches a keyword, or -1 if there are no match.
As an example, suppose the address book contains three people:
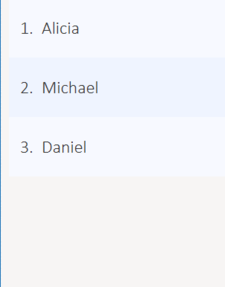
Figure 5.5.1.1: 3 People Listed in the PersonList
When a find n/ i command is executed, it will match all three of them (since all their names contains i),
and show them in this order:

Figure 5.5.1.1: 3 People Listed in the New Order
as Michael has i in the 2nd position, Alicia has an i in the 3rd position, and Daniel has an i in the 4th position.
5.5.2. Design Considerations
Aspect: Implementation of sorting
Alternative 1 (current choice): Sort the viewable list only by creating a SortedFilteredList
Pros: Preserves the original order without additional changes, sort without worrying about changing the data.
Cons: Harder to implement a permanent sort functionality.
Alternative 2: Sort the data directly
Pros: Easier to make a permanent sort.
Cons: Cannot go back to original order without additional changes. Harder to sort temporarily.
Aspect: Type of sorting in find
Alternative 1 (current choice): Sort the resulting list of find by the earliest matching index.
Pros: Make searching with short keywords more effective since the desired result is likely at the top.
Cons: Can be unintuitive, especially since it’s only done when finding by name.
Alternative 2: Show the resulting list in the default sort order.
Pros: More intuitive. No need for extra code.
Cons: Harder to find desired person when the result list is long.
Aspect: Mechanism to create comparators
Alternative 1 (current choice): sort and find uses separate method to create Comparator
Pros: More flexible since each command can do a different kind of sorting.
Cons: A lot of similar logic is copied to implement the methods individually.
Alternative 2: Create a class or method that returns Comparators.
Pros: Only implement once. Each sorting method now just need to call this method.
Cons: Take longer to code. Need to allow access to private variables in predicate classes.
5.6. Birthday
The Birthday class enables users to store their contact’s birthday details in K.N.S. Address Book. Birthday details
should be inputted in dd/mm/yyyy form, and will be stored in the address book in the same form. If the user chooses not
to enter their contact’s birthday details, the address book will automatically store the default value for empty
birthday, which is -, and the value that will appear in the Person Panel for birthday field would be the default
value.
5.6.1. Java Implementation
The Birthday class is implemented in similar way like other fields, such as address, phone, and email.
    public Birthday(String birthday) throws IllegalValueException {
        requireNonNull(birthday);
        String trimmedBirthday = birthday.trim();
        if (!isValidBirthday(trimmedBirthday)) {
            throw new IllegalValueException(MESSAGE_BIRTHDAY_CONSTRAINTS);
        }
        this.value = trimmedBirthday;
    }
5.6.2. Design Considerations
Aspect: Birthday Input Format
Alternative 1 (current choice): Using dd/mm/yyyy as the input format
Pros: It is easier for users to remember the format, as it is the format that is commonly used.
Cons: For some people who use mm/dd/yyyy format instead of dd/mm/yyyy format, they might need some time to adjust to
K.N.S Address Book’s date format. K.N.S. Address Book assumes that the date entered is in dd/mm/yyyy format and will
not send an error message when the number is valid. These users might enter 03/05/2017 which they intend to be 5 March,
but the address book will interpret it as 3 May.
Alternative 2: Using ddmmyyyy as the input format
Pros: Faster to type as it consists of only numbers and no other characters.
Cons: The format is not easy to read and is similar to phone number format.
5.7. Partial Find
The partial matching of the Find command is implemented by creating a method in the StringUtil class with the help of
the regionMatches method from the java String class.
It replaces the method for matching in all predicate classes that is used by the command.
| The Find command now only use partial matching and has lost the full matching functionality |
Previously, the method used for matching was implemented as such:
public static boolean containsWordIgnoreCase(String sentence, String word) {
        // ...check and prepare arguments..
        for (String wordInSentence: wordsInPreppedSentence) {
            if (wordInSentence.equalsIgnoreCase(preppedWord)) {
                return true;
            }
        }
        return false;
    }
By using the equalsIgnoreCase method, the query word has to exactly match, ignoring case, the sentence word for the
method to return true.
A slightly modified version of the previous method is created to allow for partial matching as such:
 public static boolean containsWordPartialIgnoreCase(String sentence, String word) {
        //..check and prepare arguments..
        return preppedSentence.contains(preppedWord);
    }
By using the contains method, the query word can now be a substring of the sentence word.
It also shortens the method, as there is no more need to check through word-by-word.
Afterwards, the use of the previous method in the Predicate classes in model
(e.g. NameContainsKeywordsPredicate) is replaced with the new method so that the Find command actually uses partial matching.
5.7.1. Design Considerations
Aspect: Exclusive use of partial matching.
Alternative 1 (current choice): Find command exclusively uses partial matching.
Pros: Simple implementation, doesn’t affect complexity from user’s perspective and easier for users to utilize Find
command.
Cons: Users lose the ability to do full matching when it would be useful
(e.g. a lot of people with similiar names).
Alternative 2: Give the option to toggle/use either partial matching or full matching
Pros: More flexible and powerful.
Cons: Requires more complicated syntax which can be confusing to new users, most use cases are already covered by
partial matching.
Aspect: Type of partial matching
Alternative 1 (current choice): Matches can be from anywhere in the word
Pros: More intuitive way of searching, simpler to understand.
Cons: Search results become less relevant for short keywords. (Mitigated by sorting the results based on match position)
Alternative 2: Matches are required to be from the start of each word.
Pros: Restricts the scope of search which increases relevancy but still giving enough flexibility for users.
Cons: Can be unintuitive, less powerful.
5.8. Find by All Field
The find by all field feature is implemented by adding one argument, prefix of field that want to be searched, to the
find command parameter. If the user does not specify the prefix, the address book will automatically search the query
in the name field. The FindCommandParser will parse the input given by the user. The mechanism to find by each field is
implemented in <field name>ContainsKeywordPredicate class (i.e. NameContainsKeywordPredicate,
AddressContainsKeywordPredicate) inside Model component.
5.8.1. Java Implementation
The FindCommandParser is now able to parse the additional prefix argument, as shown in the code snippet below:
public FindCommand parse(String args) throws ParseException {
        // make sure that the argument is valid
        // store the prefix inside String 'toSearch'
        // store the search query inside array of string 'keyword'

        if (toSearch.equals(PREFIX_TAG.getPrefix())) {
            return new FindCommand(new TagListContainsKeywordsPredicate(Arrays.asList(keywords)));
        } else if (toSearch.equals(PREFIX_PHONE.getPrefix())) {
            return new FindCommand(new PhoneContainsKeywordsPredicate(Arrays.asList(keywords)));
        } else if (toSearch.equals(PREFIX_EMAIL.getPrefix())) {
            return new FindCommand(new EmailContainsKeywordsPredicate(Arrays.asList(keywords)));
        } else if (toSearch.equals(PREFIX_ADDRESS.getPrefix())) {
            return new FindCommand(new AddressContainsKeywordsPredicate(Arrays.asList(keywords)));
        } else if (toSearch.equals(PREFIX_BIRTHDAY.getPrefix())) {
            return new FindCommand(new BirthdayContainsKeywordsPredicate(Arrays.asList(keywords)));
        } else {
            return new FindCommand(new NameContainsKeywordsPredicate(Arrays.asList(keywords)));
        }
    }
After FindCommandParser parse the arguments, it will call the <field name>ContainsKeywordsPredicate class for each respective field.
All contacts with partial matches will appear on the search result, implemented in the method below for phone field. The method is similar for other field.
public boolean test(ReadOnlyPerson person) {
        return keywords.stream().anyMatch(keyword -> StringUtil
                .containsWordPartialIgnoreCase(person.getPhone().value, keyword));
    }
5.8.2. Design Considerations
Aspect: Implementation of find by all field
Alternative 1 (current choice): Enables user to find by all field (name, phone, email, address, birthday, and
tag).
Pros: Easier for user to find their contacts when the user does not remember their contact’s name, instead they
remember the contacts' details (such as address or birthday). This feature is useful for a broader range of purpose,
for example when the user wants to send a birthday wishes to their contacts, the user can easily find by using
birthday field.
Cons: Need to type the prefix of the field that want to be searched.
Alternative 2: Find by name only.
Pros: Some people only remember their contact’s name, and find by all field feature might not be useful for them as
they don’t remember their contact’s details.
Cons: User could not find their contact details when they do not remember their contact’s name.
Aspect: Find result upon executing find command.
Alternative 1 (current choice): All contacts with partial match with the find query will appear.
Pros: With less restrictive requirement, users can find a broad range of contacts when they are searching using a
global keyword. For example, a user can find all their contacts who lived in "Clementi" when using this alternative.
Cons: More contacts will appear on the find result, some of them might not be the target contact that the user
wants to find.
Alternative 2: Only contacts with exact match will appear.
Pros: Less contacts will appear on the find result, easier to find the exact person while searching for a single
person.
Cons: It will be hard for a forgetful user to find their contacts as they may remember their contact details'
partially. This alternative is also more cumbersome when applied to find by address, as user need to type the full
address of their contact.
5.9. Add Tag and Delete Tag
Add tag and delete tag mechanism is facilitated by the addtag command and deletetag command, or their equivalent
aliases at and dt, which is useful for adding and deleting tags in a person’s tag list. On previous versions
before Add and Delete tag feature was introduced, users are able to change a person’s tag list by using edit command.
Using edit command to add and delete tags is quite cumbersome as users need to retype all the current tags that they
didn’t want to edit. addtag command and deletetag command enables user to add and delete tags using only a single
command, without retyping all the current tags.
5.9.1. Java Implementation
As addtag and deletetag are commands, their implementations are a part of Logic component in the address book.
The implementation of add tag and delete tag can be found in AddTagCommand and DeleteTagCommand. AddTagCommand and
DeleteTagCommand inherits UndoableCommands, as they modify the state of the address book (adding and deleting a
person’s tag in the address book). Therefore, users can undo/redo their previously entered addtag and deletetag
command.
addtag command is implemented in this way:
public class AddTagCommand extends UndoableCommand {
    @Override
    public CommandResult executeUndoableCommand() throws CommandException {
        // ... list logic ...
    }
}
addtag command can be used by calling the method with an index and a string of tag name that will be added, shown by
this code snippet:
public AddTagCommand(Index index, Set<Tag> addedTag) {
    requireNonNull(index);
    requireNonNull(addedTag);

    this.index = index;
    this.addedTag = addedTag;
}
Similar to addtag command, deletetag command is implemented in this way:
public class DeleteTagCommand extends UndoableCommand {
    @Override
    public CommandResult executeUndoableCommand() throws CommandException {
        // ... list logic ...
    }
}
deletetag command can be used by calling the method with an index and a string of tag name that will be added, just
like addtag command, shown by the following code snippet:
public DeleteTagCommand(Index index, Set<Tag> deletedTag) {
    requireNonNull(index);
    requireNonNull(deletedTag);

    this.index = index;
    this.addedTag = deletedTag;
}
5.9.2. Design Considerations
Aspect: Implementation of AddTagCommand and DeleteTagCommand
Alternative 1 (current choice): Implementing a new command addtag and deletetag instead of using the existing
Edit command.
Pros: Users can add and delete a single tag only by typing the new tag that they want to assign or remove from
a contact. addtag and deletetag supports adding and deleting several tags at a single execution.
Cons: More commands to remember.
Alternative 2: Use existing Edit command to add or delete tags from a person in the address book.
Pros: Less commands to remember.
Cons: Users need to retype all existing tags they want to keep when they are using edit command. Users might
mistype existing tags or not typing a complete set of existing tags while using edit command.
5.10. Theme Switcher
The Theme Switcher allows users to change the appearance of the application via the command theme or the drop-down
selection in the MenuBar. There are 5 themes for users to choose from: Light, Dark, Red, Blue, and Green. Here is what
the application looks like in each theme:
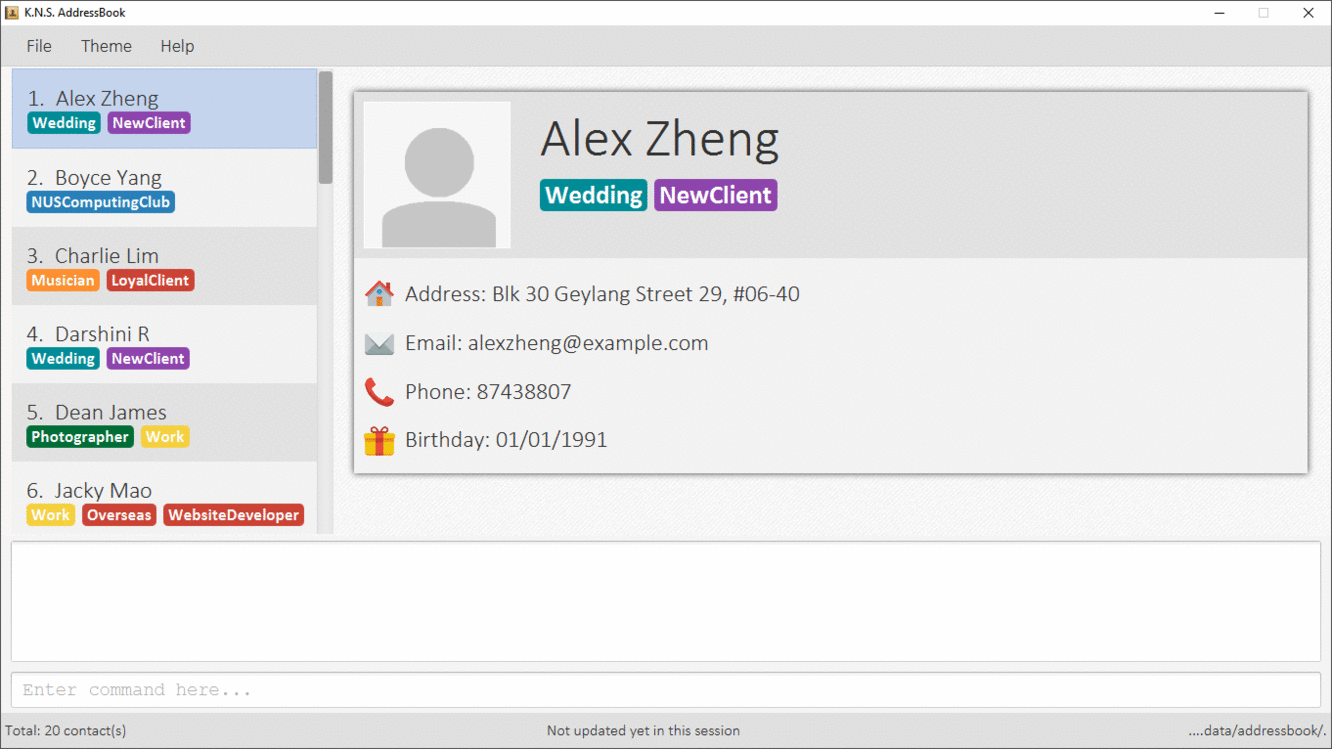
Figure 5.10.1: All 5 Themes of the Application
5.10.1. Java Implementation
The Theme Switcher mainly spans over the Logic and UI components.
@Override
public CommandResult execute() throws CommandException {
    if (!isValidTheme(this.theme)) {
        throw new CommandException(Messages.MESSAGE_INVALID_THEME);
    }
    if ((MainWindow.getCurrentTheme()).contains(this.theme)) {
        throw new CommandException("Theme is already set to " + this.theme + "!");
    }
    EventsCenter.getInstance().post(new ChangeThemeRequestEvent(this.theme));
    return new CommandResult(String.format(MESSAGE_THEME_SUCCESS, this.theme));
}
Code Snippet 1A (execute()): When the theme command is executed, it checks for two conditions:
-
Theme Validity → It checks the input arguments for the 5 preset themes. If an invalid theme is given, then a
CommandExceptionis thrown to inform the user that their input theme does not exist. -
Current Theme Displayed → In order to prevent the user from setting the current theme to the same exact theme, it checks whether the valid argument is currently the displayed theme. If it is, then a
CommandExceptionis thrown to inform the user of their error.
If the two conditions are fulfilled, then the theme command will generate a new ChangeThemeRequestEvent for
MainWindow to accept, and return a successful CommandResult.
@Subscribe
public void handleChangeThemeRequestEvent(ChangeThemeRequestEvent event) throws CommandException, ParseException {
    logger.info(LogsCenter.getEventHandlingLogMessage(event));
    mainWindow.getStylesheets().remove(currentTheme);
    prefs.setAddressBookTheme(event.theme + "Theme.css");
    currentTheme = "view/" + prefs.getAddressBookTheme();
    mainWindow.getStylesheets().add(currentTheme);
}
Code Snippet 1B (handleChangeThemeRequestEvent(ChangeThemeRequestEvent event)): The event generated by the
theme command is received in MainWindow. It takes removes the CSS for the current theme, and replaces it with the
input theme’s CSS. The change in appearance is reflected immediately.
To better illustrate code snippets 1A and 1B, the following sequence diagram demonstrates a user entering a valid theme command input:
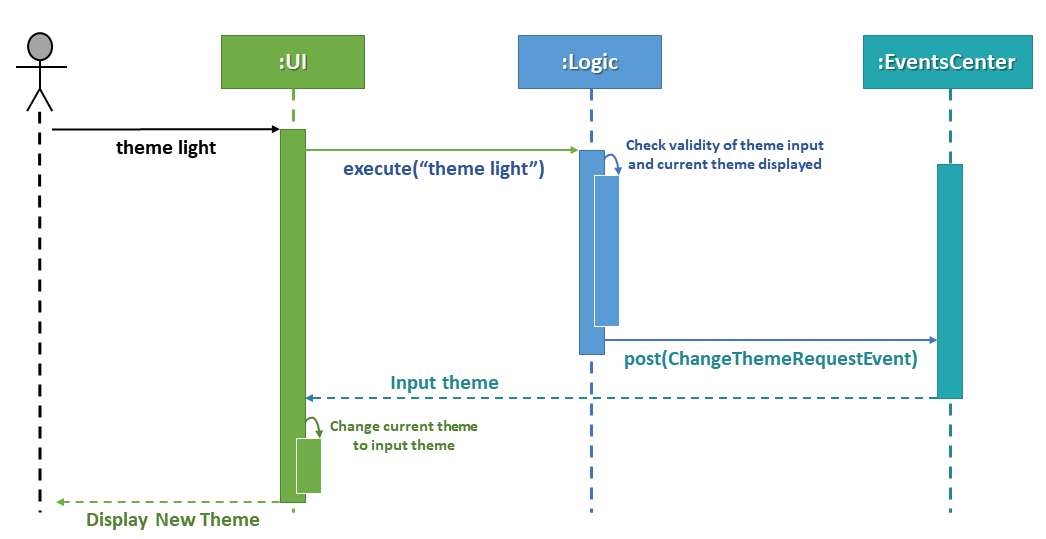
Figure 5.10.1.1: Sequence Diagram for Valid Theme Command
MainWindow does not need to check for the theme validity or whether the same theme is being set, because the theme
command has already accounted for these conditions.
|
@FXML
private void setToVALIDTheme() {
    if (checkSameTheme("VALID")) {
        return;
    }
    mainWindow.getStylesheets().remove(currentTheme);
    prefs.setAddressBookTheme("VALIDTheme.css");
    currentTheme = "view/" + prefs.getAddressBookTheme();
    mainWindow.getStylesheets().add(currentTheme);
    EventsCenter.getInstance().post(new ChangeThemeRequestEvent("VALID"));
    raise(new NewResultAvailableEvent("Theme updated to: VALID", false));
}
Code Snippet 2 (setToVALIDTheme()): Where "VALID" is Light, Dark, Red, Blue or Green. If the user uses the
MenuBar to change the current theme, then it will call the appropriate method to change the current theme to it. Also,
the method ensures that if the user selects the theme that is already being displayed, it will raise a
NewResultAvailableEvent to inform the user of their error.
MainWindow needs to check whether the same theme is being set since no theme command is being executed.
|
5.10.2. Design Considerations
Aspect: Providing a GUI option for switching themes
Alternative 1 (current choice): Provide a GUI option via the MenuBar.
Pros: Simple to implement and users can change themes seamlessly.
Cons: Users will not know what the colour scheme of the theme looks like unless they change to it.
Alternative 2: Provide a GUI option via coloured buttons.
Pros: Users will be able to see the colour scheme of the theme before changing to it.
Cons: Users may get confused as to what these buttons are for.
5.11. Logging
We are using java.util.logging package for logging. The LogsCenter class is used to manage the logging levels and
logging destinations.
-
The logging level can be controlled using the
logLevelsetting in the configuration file (See Configuration). -
The
Loggerfor a class can be obtained usingLogsCenter.getLogger(Class)which will log messages according to the specified logging level. -
Currently log messages are output through:
Consoleand to a.logfile.
Logging Levels
-
SEVERE: Critical problem detected which may possibly cause the termination of the application. -
WARNING: Can continue, but with caution. -
INFO: Information showing the noteworthy actions by the application. -
FINE: Details that is not usually noteworthy but may be useful in debugging e.g. print the actual list instead of just its size.
5.12. Configuration
Certain properties of the application can be controlled (e.g App name, logging level) through the configuration file
(default: config.json).
6. Documentation
We use asciidoc for writing documentation.
| We chose asciidoc over Markdown because asciidoc, although a bit more complex than Markdown, provides more flexibility in formatting. |
6.1. Editing Documentation
See UsingGradle.adoc to learn how to render .adoc files locally to preview
the end result of your edits. Alternatively, you can download the AsciiDoc plugin for IntelliJ, which allows you to
preview the changes you have made to your .adoc files in real-time.
6.2. Publishing Documentation
See UsingTravis.adoc to learn how to deploy GitHub Pages using Travis.
6.3. Converting Documentation to PDF format
We use Google Chrome for converting documentation to PDF format, as Chrome’s PDF engine preserves hyperlinks used in webpages.
Here are the steps to convert the project documentation files to PDF format.
-
Follow the instructions in UsingGradle.adoc to convert the AsciiDoc files in the
docs/directory to HTML format. -
Go to your generated HTML files in the
build/docsfolder, right click on them and selectOpen with→Google Chrome. -
Within Chrome, click on the
Printoption in Chrome’s menu. -
Set the destination to
Save as PDF, then clickSaveto save a copy of the file in PDF format. For best results, use the settings indicated in the screenshot below.
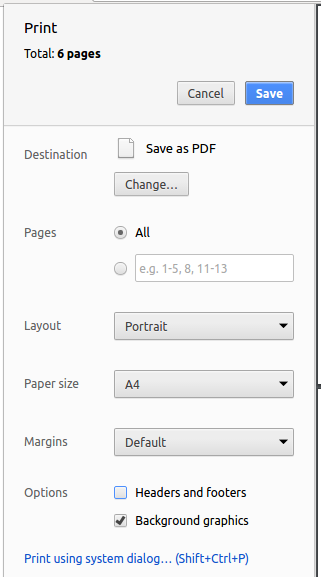
Figure 6.3.1: Saving documentation as PDF files in Chrome
7. Testing
7.1. Running Tests
There are three ways to run tests.
| The most reliable way to run tests is the 3rd one. The first two methods might fail some GUI tests due to platform/resolution-specific idiosyncrasies. |
Method 1: Using IntelliJ JUnit test runner
-
To run all tests, right-click on the
src/test/javafolder and chooseRun 'All Tests' -
To run a subset of tests, you can right-click on a test package, test class, or a test and choose
Run 'ABC'
Method 2: Using Gradle
-
Open a console and run the command
gradlew clean allTests(Mac/Linux:./gradlew clean allTests)
| See UsingGradle.adoc for more info on how to run tests using Gradle. |
Method 3: Using Gradle (headless)
Thanks to the TestFX library we use, our GUI tests can be run in the headless mode. In the headless mode, GUI tests do not show up on the screen. That means the developer can do other things on the Computer while the tests are running.
To run tests in headless mode, open a console and run the command gradlew clean headless allTests
(Mac/Linux: ./gradlew clean headless allTests)
7.2. Types of tests
We have two types of tests:
-
GUI Tests - These are tests involving the GUI. They include,
-
System Tests that test the entire App by simulating user actions on the GUI. These are in the
systemtestspackage. -
Unit tests that test the individual components. These are in
seedu.address.uipackage.
-
-
Non-GUI Tests - These are tests not involving the GUI. They include,
-
Unit tests targeting the lowest level methods/classes.
e.g.seedu.address.commons.StringUtilTest -
Integration tests that are checking the integration of multiple code units (those code units are assumed to be working).
e.g.seedu.address.storage.StorageManagerTest -
Hybrids of unit and integration tests. These test are checking multiple code units as well as how the are connected together.
e.g.seedu.address.logic.LogicManagerTest
-
7.3. Troubleshooting Testing
Problem: HelpWindowTest fails with a NullPointerException.
-
Reason: One of its dependencies,
UserGuide.htmlinsrc/main/resources/docsis missing. -
Solution: Execute Gradle task
processResources.
8. Dev Ops
8.1. Build Automation
See UsingGradle.adoc to learn how to use Gradle for build automation.
8.2. Continuous Integration
We use Travis CI and AppVeyor to perform Continuous Integration on our projects. See UsingTravis.adoc and UsingAppVeyor.adoc for more details.
8.3. Making a Release
Here are the steps to create a new release.
-
Update the version number in
MainApp.java. -
Generate a JAR file using Gradle.
-
Tag the repo with the version number. e.g.
v0.1 -
Create a new release using GitHub and upload the JAR file you created.
8.4. Managing Dependencies
A project often depends on third-party libraries. For example, Address Book depends on the
Jackson library for XML parsing. Managing these dependencies can be automated
using Gradle. For example, Gradle can download the dependencies automatically, which is better than
these alternatives.
a. Include those libraries in the repo (this bloats the repo size)
b. Require developers to download those libraries manually (this creates extra work for developers)
Appendix A: User Stories
Priorities: High (must have) - * * *, Medium (nice to have) - * *, Low (unlikely to have) - *
| Priority | As a … | I want to … | So that I can… |
|---|---|---|---|
|
new user |
see usage instructions |
refer to instructions when I forget how to use the App |
|
normal user |
add a new person |
fill my address book with contacts |
|
normal user |
edit contact details |
keep entries updated |
|
normal user |
delete a person |
remove entries that I no longer need |
|
normal user |
find a person by name |
locate details of persons without having to go through the entire list |
|
normal user |
find a person based on tags |
find my contacts with the same tag group easily |
|
normal user |
undo command |
correct my mistake |
|
normal user |
redo command |
correct my undo easily |
|
normal user |
store multiple details for contact (e.g multiple phones) |
store details thoroughly |
|
normal user |
set favorite contacts |
look them up more quickly |
|
normal user |
find contact based on phone number |
know who calls me when unknown number calls/text message me |
|
student/worker |
assign groups/tags |
categorise and sort my contacts as needed |
|
forgetful user |
find with partial matches |
search for contacts that I only partially remember the name of |
|
user with multiple address book |
import contact details |
copy contacts to another address book easily |
|
careful/paranoid user |
back up my contacts' details |
Restore the contacts in case the original storage file is deleted or corrupted |
|
careful/paranoid user |
export my contacts' details |
restore them in another computer if needed |
|
user |
hide private contact details by default |
minimize chance of someone else seeing them by accident |
|
expert user |
use the product seamlessly |
start using the product immediately and easily |
|
expert user |
set aliases for commands |
easily remember the command |
|
elderly person |
adjust the product’s font-size |
view my contacts' details with ease |
|
shared computer user |
enable a PIN/password |
no one else can view my contacts |
|
forgetful user |
see my last command |
know the last change that I made |
|
user |
see recently accessed contact |
easily find the person’s details without searching |
|
user |
input case-insensitive command |
input command easily |
|
user |
add a picture to contact |
remember my contact better |
|
user |
get suggestion for command correction |
input correct command easily after I input wrongly |
|
user |
save my contact’s birthday |
remember my contact’s birthday |
|
user |
get reminded of a contact’s birthday |
wish him/her happy birthday |
|
user multiple devices |
set multiple instances of app to be in sync |
use address book across multiple devices seamlessly |
|
picky user |
change the colour appearance |
view my address book in my favourite colour scheme |
|
user with many persons in the address book |
sort persons by name |
locate a person easily |
|
picky user |
change font type |
make my address book as fancy/simple as I like |
|
picky user |
add font colour to my contact’s name |
make the address book colourful |
|
picky user |
have an address book with sound effects |
my address book is "cool" |
Appendix B: Use Cases
For all use cases below, the System is the AddressBook and the Actor is the user, unless specified otherwise.
Use case: Delete person
MSS
-
User requests to list persons
-
AddressBook shows a list of persons
-
User requests to delete a specific person in the list
-
AddressBook deletes the person
Use case ends.
Extensions
-
2a. The list is empty.
Use case ends.
-
3a. The given index is invalid.
-
3a1. AddressBook shows an error message.
Use case resumes at step 2.
-
Use case: Edit person’s details
MSS
-
User requests to list persons
-
AddressBook shows a list of persons
-
User requests to edit a specific person in the list’s details to something else
-
AddressBook edits the details and shows the updated person
Use case ends.
Extensions
-
2a. The list is empty.
Use case ends.
-
3a. The given index is invalid.
-
3a1. AddressBook shows an error message.
Use case resumes at step 2.
-
-
3b. The given detail field or value is invalid
-
3b1. AddressBook shows an error message.
Use case resumes at step 2.
-
Use case: Assign tag to a person
MSS
-
User requests to list persons
-
AddressBook shows a list of persons
-
User requests to to add a given tag to a specific person
-
AddressBook adds the tag to person’s details
Use case ends.
Extensions
-
2a. The list is empty.
Use case ends.
-
3a. The given index is invalid.
-
3a1. AddressBook shows an error message.
Use case resumes at step 2.
-
-
3b. The given tag is invalid
-
3b1. AddressBook shows an error message.
Use case resumes at step 2.
-
{More to be added}
Appendix C: Non Functional Requirements
-
Should work on any mainstream OS as long as it has Java
1.8.0_60or higher installed. -
Should be able to hold up to 1000 persons without a noticeable sluggishness in performance for typical usage.
-
Should be available to use as long as the computer has sufficient power.
-
Should be available to use with or without internet access.
-
A user with above average typing speed for regular English text (i.e. not code, not system admin commands) should be able to accomplish most of the tasks faster using commands than using the mouse.
-
A user with little to no experience with a command line interface should be able to have easy access to the user guide, and be able to familiarise himself/herself with the commands.
-
A user should only be able to use the supported commands; unsupported commands should be handled gracefully.
-
A user is able to back up and restore all contacts in the event of the application breaking.
-
The response to any user action should become visible within 5 seconds at maximum contacts capacity.
-
The application should be offered as a free software available for download.
-
The functionality of the application should be able to be increased or extended even after deployment.
-
The source code should be open source.
Appendix D: Glossary
-
Avatar: A picture representing a particular person in the address book.
-
Command Line Interface (CLI): It is an interface which users respond to a visual prompt by typing in a command on a specified line, receive a response back from the system, and then enter another command. This goes on back and forth.
-
Graphical User Interface (GUI): It is a graphical (rather than purely textual) user interface to a computer.
-
Java: It is a general-purpose computer programming language that is used in many products today. To learn more, click here.
-
Mainstream OS: Examples include Windows, Linux, Unix, Mac OS X.
-
Open Source: Software for which the original source code is made freely available and may be redistributed and modified.
-
Private Contact Detail: A contact detail that is not meant to be shared with others.
-
Sequence Diagram: A sequence diagram is an interaction diagram that shows how objects operate with one another and in what order.
-
Triadic Colour Scheme: A colour scheme that uses only three colors that are equally spaced around the color wheel.